


Our ‘My First...’ series offers easy-to-remember advice in a bullet point-style for a selection of first times on a bike; from the first time you get a puncture to the first time you change your oil, we’ve got some top tips to help you out.
Your first puncture tends to be the worst for two reasons:
You don’t recognise the symptoms of impending doom, so keep riding while wondering why your bike feels increasingly odd. We’ll come to the risks of this in a minute.
You don’t realise what an utter ball-ache a puncture is, so you’ve set out with no repair kit and no breakdown cover.
The result of these two is, at its absolute best, a tedious wait by the side of the road while a mate with a van comes and picks you up. But it could be a lot, lot worse.
Ride too long with a puncture and the tyre will eventually deflate completely, making your bike almost impossible to steer. And even if you manage not to crash (which does happen) the tyre may be unrepairable because the heat build-up has trashed it.


So, how to cope with your first puncture? Simple. Just follow these steps, which apply to tubeless tyres (i.e. most of them – tubed tyres are now only used on classics and the occasional spoked modern bike):
Pack a repair kit. This might be irritatingly irrelevant if you’re reading this on the hard shoulder of the M6 wondering what to do next (see 11), but for the rest of us they’re about £25 and fit under most pillion seats or happily live at the bottom of your rucksack. Get one with at least three gas canisters (you’ll need them all) and a nylon case (otherwise the pointy tools will eventually escape). Alternatively, get breakdown recovery.
If the steering feels heavier than normal, or the ride feels mushy, or you seem to be losing power, or there’s a Land Rover tyre hum coming from below, stop as soon as it’s safe to do so. Trust your instincts – if it feels odd, stop. Never ride along trying to work out what’s going on or trying to look at the tyres. Just roll off the throttle and stop as gently as possible – no emergency braking. If you’re on a motorway, pull over to the hard shoulder, ideally tucking behind the barriers after a bridge. Do not try to make the next exit – at motorway speeds you might get a blow-out or worse before then, which is a whole new world of pain.
Get the bike as far off the road as possible and stick your hazards on if you have them. If you can see somewhere safe nearby like a layby, stick the bike in gear and use the engine to walk it there (it’ll be a bugger to push with a flat tyre). If it’s dark, leave the lights on. You really, really don’t want some plonker crashing into you. When you’re peering at the tyre, don’t stick your arse out into the traffic – point your backside at the hedge, which is less likely to crash into you because it’s texting.
If you have a puncture repair kit, happy days. Well, not happy. But nowhere near as bade as it could have been. Follow the repair instructions below. If you haven’t packed a kit, go straight to 11)
Read the puncture repair kit instructions. No, really. They’re often in Chinglish, but it’s still worth doing – it’s surprisingly easy to stuff this up if you miss a step.
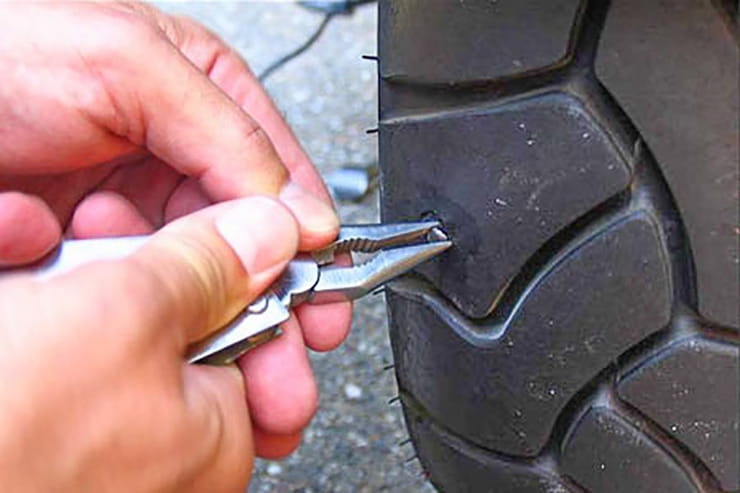
Find the source of the puncture. You’ll either see a nail or screw poking out of the tyre, or the hole it left. It’ll usually be in the central portion of the tyre. If the puncture is in the sidewall, go to 11)
Enlarge the hole by running the reaming tool through it. This cleans the hole and lets you get the plug in. If you don’t do it enough, the plug won’t fit in.
Cover the plug in adhesive, stuff it all the way into the hole, then pull the tool out. This should leave the plug stuffed in the hole. Cut off the excess plug with the knife in the kit.
Fit an adapter to one of the gas canisters and screw it onto the valve. A 180-section rear tyre (punctures are usually in rears because we tend to run them until there’s less tread on them) will need five bottles to get over 30psi, but three should get you to 20psi. That’s enough to get you safely to a forecourt where you can top it up.
The kits say don’t do over 40mph, but we’d advise using your common sense. If you’re on a motorway, do 60mph with the trucks until you get to a forecourt airline, then ride steadily home. In our experience, well applied plug patches are remarkably resilient.
If you have no repair kit, or the puncture is in the sidewall, you need to get the bike recovered. If you’ve got breakdown recovery, call it and settle back. Ditto, friends with vans or trailers. If you haven’t, it’s time to type ‘recovery truck near me’ into Google and prepare the credit card. Expect a £50 call-out charge, plus £1 per mile weekdays, more at weekends, bank hols etc.
Get the tyre replaced or professionally fixed. Some tyre manufacturers don’t recommend it, but we’ve had no problems when tyres are fixed from the inside, using a sturdy version of a bicycle patch.


What about the cans of glue that you spray into the tyre?
They’re better than nothing but we don’t like them. Yes, they’re marginally quicker than using a plug kit, but they’re not as secure, can wreck valves and mean a permanent repair often isn’t possible.
Can I prevent punctures?
Sort of. In our experience, most punctures happen to worn tyres, so if you’re running down to the last mm of tread you’re more likely to get one. Also, by examining your tyres regularly, you can spot screws, nails etc. before they seriously deflate the tyre. Fixing a puncture in your garage or at work is generally preferably to doing it by the A14. There are gloops which you squirt in the tyre and which claim to fix punctures as they happen, but we’re not keen. We don’t fancy the idea of thrashing down an autobahn unaware that your tyre has three punctures and might well go pop. Plus they knacker valves.
Share on social media:


