How to rebuild a motorcycle brake master cylinder


By John Milbank
Consumer Editor of Bennetts BikeSocial
06.02.2020


The brakes are the most important part of your motorcycle, so it’s vital they’re kept in perfect working order.
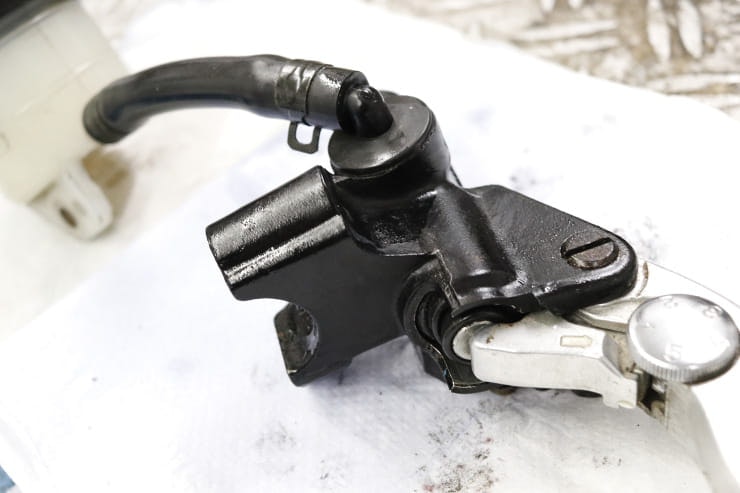
The master cylinders on both the front and the rear of the bike are basically the same – a piston that pushes brake fluid down the lines to the caliper (the slave), in turn forcing the pistons out to press the brake pads against the disc. The size of the piston in the cylinder will have been matched to the calipers based on the feel the manufacturer wanted, so always take care if one or the other has been changed by a previous owner. A larger than optimal master cylinder will give less travel to the brake lever but require more force, whereas a smaller cylinder will give more lever travel, but need less force.
Repairing the master cylinder is far less likely to be necessary than working on the calipers, but if you’ve checked everything else, and it is playing up, here’s how to rebuild it…
How do I look after my brake master cylinder?
The most important thing is to change the brake fluid every two years, which will help prevent any corrosion occurring inside.
Other than that, there’s typically little that needs doing to look after a brake master cylinder besides keeping the reservoir lid closed and keeping the outside clean (like the rest of the bike). I have a 1999 Kawasaki ZX-6R, and according to the Haynes manual, the seals in the calipers and the master cylinder should be replaced every two years, though this is unusually frequent.
It’s very important that you use the specified fluid that’s shown in the owner’s manual for your bike. Check what it says on the top of the reservoir cap too, just in case a previous owner has changed the master cylinder. Hydraulic clutch master cylinders will be much the same as those on brakes, but again, check very carefully what fluid should be used as some run mineral oil, which isn’t compatible with the seals used for brake fluid (and vice versa).
Other than that, keep the brake lever’s pivot pin greased to avoid it getting corroded.
Expert tip: Don’t use cheap levers
“Never use cheap aftermarket brake levers” says Nick Nomikos, owner and MoT tester at The Two Wheel Centre in Harpenden. “Only ever fit original equipment (OE) or high-quality replacements, ideally those homologated for use with the bike by the manufacturer. It’s not scaremongering to say that cheap levers have been known to bind after several miles, causing the brakes to lock on.”
How long should my brake master cylinder last?
Really, unless it’s damaged in some way, there’s little reason the master cylinder shouldn’t last the lifetime of the bike – the calipers are more likely to need rebuilding long before the front or rear master cylinder. You can find out how to do them by clicking here.


Keep the fluid changed regularly to help preserve the life of your braking system
How do I know when my master cylinder needs servicing/replacing?
If you pull the brake lever (or push down on it, in the case of the rear) and it feels graunchy, it’s most likely that the lever pivot pin is corroded – it should be replaced, but if it’s not badly damaged you can clean it up and grease it.
The other reason for a rough feel to the lever (or pedal) is that the brake fluid has picked up water, so needs replacing. You can follow our simple steps for changing it here.
If the brakes won’t maintain pressure, leading to the lever pulling back to the bar (or the pedal sinking to the bottom) – however slowly – it could be that the seals in the master cylinder are worn or damaged. Do make sure though that your brake calipers have been thoroughly serviced and checked, and that you’ve properly attempted to bleed the fluid first.
Keep in mind that if you have ABS on your bike, it might be necessary to re-prime the ABS pump after air has been introduced into the system; it’s important to check with your dealer. If you’re in any way unsure about working on your bike yourself, the brakes are best left to a professional mechanic – do know your limitations.

Wemoto’s master cylinder rebuild kits come with everything you need
What parts do I need?
It’s vitally important that you use quality parts when working with your brakes; do not scrimp on unknown brands or cheap kit from auction sites when it comes to brakes; either go for OE or a known-brand from a reliable distributor. A complete front OE master cylinder costs £267.44 (£252.07 for the rear), but to replace the seals, piston and spring would cost £44.65 from Kawasaki (£41.29 rear). I’ve fitted the Japanese-made TourMax master cylinder repair kit, which costs just £26.39 for the front and £24.50 for the rear from Wemoto. The sets include a new piston, spring, seals, circlip and a small pot of red rubber grease.


What tools do I need?
This article isn’t intended to be all you need to repair the brake master cylinder on any motorcycle. I’m basing it on my 1999 Kawasaki ZX-6R, but your bike will have its own unique needs, so I thoroughly recommend buying a Haynes workshop manual first. My hope is that this will give you the confidence to take on the job for yourself, but only with a workshop guide specific to your machine will you have the correct procedure. Remember that Bennetts customers can save a massive 40% on Haynes manuals at Bennetts Rewards. You’ll also need the following…
Screwdrivers
Spanners
Circlip pliers (you might get by with a pick and screwdriver, but it’s more difficult)
Possibly Allen keys
Right-angle pick
Aerosol can of brake cleaner
Protective gloves
Brake fluid
Replacement copper washers for the banjo bolt
A clean workspace
How do I rebuild the brake master cylinder on my motorcycle?
Make sure that you have a clean space to work – you need a bench or table, not the floor for these parts, which must be kept spotlessly clean.
Make sure everything on your bike that could get brake fluid splashed on it is covered up, and have some water to hand to quickly rinse away any spills – brake fluid and paint don’t mix well at all.

If you’re working on the rear master cylinder, hold the bottom of the cylinder plunger arm in a vice and take note of the position of the nuts that secure it before removing, leaving you with a threaded end.
Step 1: Remove the master cylinder
It’s easiest to remove a lot of the parts around the master cylinder while it’s on the bars – take the lever off for a start. If you’re working on the back brake, you’ll need to detach the master cylinder from the lever, which is usually a pin with a split-pin behind the footrest hanger.
Crack the banjo bolt then leave it finger tight, so no fluid leaks out. Put some rag around the bolt to make sure it doesn’t leak while you remove the bolts that hold the master cylinder to the bars, then move it away from the bike, being careful not to kink the brake lines.
Now open the master cylinder and empty the brake fluid into a container, ready to be disposed of at your local tip. Remove the banjo bolt with the cylinder over your container to catch any fluid that drips, then secure the brake lines in such a way that the fluid won’t leak out.
Finally, you can remove the reservoir (if it’s not part of the main body casting), and its pipe if it has one.

Step 2: Remove the rubber boot
Using a right-angled pick, remove the rubber boot that covers the end of the piston, or in the case of the rear brake, that surrounds the threaded plunger rod.

Step 3: Remove the circlip
Using circlip pliers, prize the circlip out of the end of the master cylinder. You might be able to do this with a pick and screwdriver, but it’s a lot more fiddly.


The spring in my front brakes was looking pretty nasty, while the bore and piston were covered in gunk.
Step 4: Take out the piston and spring
The piston should now drop out of the cylinder body. In the case of my ZX-6R’s rear master cylinder, I found it easiest to poke it out with an allen key from the top, where the banjo bolt enters.
On my bike’s front piston, the spring is attached to a separate seal, whereas on the rear cylinder the spring is clipped onto the piston.

Step 5: Check and clean the cylinder and reservoir
Using brake cleaner and clean paper workshop towels or lint-free cloth, thoroughly clean the inside of the cylinder and any fluid pathways. Pay particular attention to the feed and return passageways in the bottom of the reservoir as these are very fine and can easily get blocked. If it’s corroded inside, you’ll almost certainly need to replace the master cylinder – look for a second-hand one in good condition if you can, but still rebuild it with new seals.
My ZX-6R had been left for almost a decade without a brake fluid change, and it had gone pretty nasty. Fortunately though, the master cylinders were both fine once cleaned up.

You can check the position of the seals on the new piston (bottom) with the old one… assuming it was correctly assembled in the first place!
Step 6: Fit the new seals to the new piston
Lubricate the new seals with fresh, clean brake fluid, then carefully pop them onto the piston, taking care that they go on in the correct locations and are the right way around. You can check them against the old piston, or look at a parts diagram; you can often find them on Fowlers Parts.

Step 7: Fit the new spring
Whether the spring attaches to a seal or the piston, it will likely be wider at one end – check from your old parts how it should go on, or look at a parts diagram.

Step 8: Insert the spring and piston assembly
Drop the spring and piston into the cylinder body, making sure they go in the correct way around.

Step 9: Fit a new circlip
Hold the plunger down then insert a new circlip into the groove inside the body of the master cylinder (the TourMax kits from Wemoto come with them). Make absolutely sure it’s in the bottom groove (not the one that the boot might fit into), and once in, use the pick to check it can rotate within the groove, which proves it’s properly seated.

Step 10: Fit the boot
Put some of the red rubber grease into the back of the new rubber boot, then pop it on, making sure it slips into the groove in the cylinder body, and over the end of the piston in the case of the front. If you need to poke it in, don’t use anything sharp that could damage it.
Expert tip: Check the seal before fitting
“You can check the master cylinder is working before refitting it,” says Nick Nomikos, owner and MoT tester at The Two Wheel Centre in Harpenden. “Hold your finger over the banjo hole then pump it several times. As you let your finger go, you should hear a hiss as the air escapes.”
Step 11: Fit the cylinder back onto the bike
Refit any items like the reservoir etc (after cleaning them thoroughly), then bolt the master cylinder back onto the bike. In the case of the rear cylinder, you’ll need to set the position of the end using the nuts, and make sure the split-pin is back in correctly when connecting it to the pedal; if the pin’s in any way damaged, replace it.
The clamp that holds the front master cylinder to the bars will probably have an arrow on it saying which way up it should be fitted – make sure you do it the correct way, then tighten the top bolt up before the bottom. And don’t over-tighten them; on this bike they only need 6.9Nm.
Refit the brake lines using new copper washers around the banjo bolt (remember the one between the two lines, if two come out of the cylinder) and tighten properly.
While the lid of the reservoir is off, don't forget to check the condition of the diaphragm and any breather holes as these are key to the smooth operation of the system.

Step 12: Fill with new fluid and bleed the system
Follow our simple guide here to bleed new fluid into the system. It can be hard to get rid of any air trapped in the master cylinder, but with rapid pumping it should start to pull through. If necessary, you might want to pull the lever in, then crack open the banjo bolt, closing it again as the lever reaches the end of its stroke – repeat this until the cylinder is properly primed and fluid starts to come out around the banjo bolt (it’s also known as ‘bench bleeding’ on car master cylinders, but on a bike it’s easier to do it fitted to the bars); be careful not to spill any fluid.
As with any work on your bike, check everything carefully and test thoroughly before picking up speed.

If you can’t do this job yourself, your dealer will be happy to take the work on. While prices will vary, Nick Nomikos, owner and MoT tester at The Two Wheel Centre in Harpenden (as well as our technical advisor) says he’d charge £66, plus parts and brake fluid.