How to clean a motorcycle carburettor without removing it


By Phil West
Freelance journalist/editor/author
04.02.2020


If you’ve got an older bike that’s a pain to start, or won’t tick over evenly, or stutters when you give it some gas (or indeed all of the above) then you might have a carburettor problem – they’re almost as common as electrical faults. But the good news is carbs are relatively easy to clean so the task should be near the top of your ‘jobs to do’ list if your bike is playing up.
Problems generally arise because carbs rely on fuel going through very small holes, which can be easily blocked by gunk. This is particularly common after a bike has been left standing – it only takes a bit of rust from the tank, or a tiny fragment of seal that’s been eaten away to clog part of the carb, which then restricts fuel getting into the combustion chamber, which makes the engine splutter like a politician on Newsnight. So here’s how to clean your carbs…

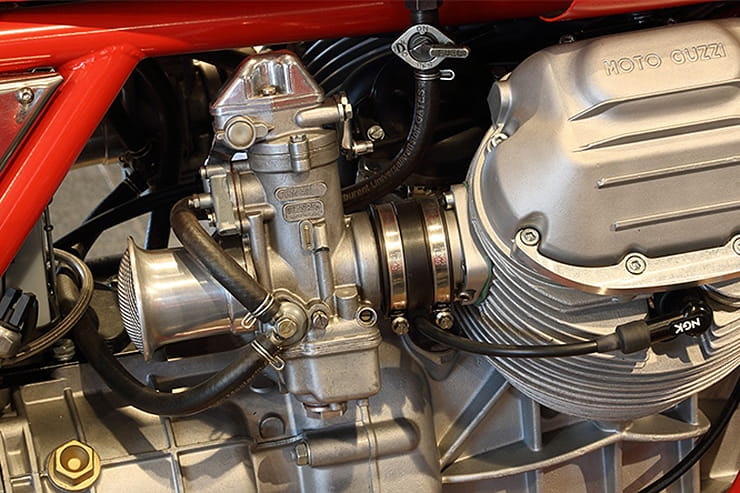
If you have a Guzzi or BMW twin, carb cleaning is a doddle because they hang out in the breeze.
How to clean a carb without taking it off
Getting carbs off a bike is usually far more of a hassle than actually cleaning them because the intake rubbers are sometimes a pig to get off and re-fit, and you have to remove the throttle cable which can be fiddly too. So, stage one is to try and get rid of the gunk with the carbs in place, though the feasibility of this depends on how much space you’ve got below them. Small single or twin cylinder bikes are usually a far easier proposition than across the frame fours. BMW twins and Guzzis are easiest of all because their carbs hang in the breeze. With the carbs in place, you can’t do a thorough clean, but it’s definitely worth a go.


A simple carb on a single cylinder bike (this is from an SR125) is a good place to practice your carb cleaning. You can see how the float bowl on the bottom is attached by a screw at each corner.
Carb cleaning process
Safety checks. Have you turned off the petrol? Are you wearing mechanic’s gloves (carb cleaner and petrol are evil on your skin)? Is the bike cold (petrol leaking on hot exhausts is not good)? Every shed should have a fire extinguisher too.
Move the bike to a clean, clear bit of floor. The carb is full of small parts – God forbid you drop one, but if you do, a clean floor will mean you might actually find them.
Drape a plain-coloured cloth over the casings below the carb. This will absorb any fuel and carb cleaner and it will help catch any small parts if, God forbid, you drop them. If you’re getting the feeling that dropping parts is a bad idea, you’d be right. That’s the main risk with a carbs-in-place clean.
Drain the float bowls. There should be a solitary bolt or screw on the base of the carb. Undo it slowly and fuel will start to leak out – catch it with a pot if possible. If fuel just keeps coming, you might want to turn the petrol off…
Remove the float bowl, often held on by four crosshead screws. Check the float bowl for gunge. If there’s loads, you’re on the right track. Clean it with carb cleaner spray.
Remove the float – it’s held in place by a small pin that can just be pushed out. As the float comes out, look out for a little valve that the float pushes on to stop the fuel flow when it’s at the right level. This will come out with the float. Give it a clean.
Peer under carb and you’ll see the most likely blockage culprits, the jets – what look like two bolts with holes in the middle. Spray liberally with carb cleaner – trying to direct the cleaner into the jets – and leave to soak for a few minutes.
Use an air line (or a can of pressurised air, sold as an ‘air duster’) to blow through the jets. Repeat the previous step and this one until you can see no more gunge.
Put the carbs back together, turn on the fuel and start the bike. Hopefully you’ve cleared the blockage and it’s as sweet as a nut. If not…

To remove the carb you need to take off the throttle cable. In the close confines of an across the frame four-cylinder bike, this can be a royal pain in the arse.
Taking the carbs off to clean
If a quick and dirty clean hasn’t worked, it’s time for phase two:
Order a service kit for your carb. We’ll talk about cleaning below, but if you’re going to the bother of removing the carbs, you might as well replace all the jets, gaskets, seals etc while you’ve got it apart. They’re not too pricey and save you fiddling about trying to clean the jets.
Remove the carb. This usually means removing the throttle cable, airbox (or filter) and whatever else is either in the way, or holding the carb in place.
With the carb out, place it on a clear bench – you’ll be removing all the small parts, so you don’t want them disappearing into a pile of wood shavings.
Give the whole carb a good general clean to stop any filth getting into the crucial bits as you work.
Remove the float bowl and float as above.
Remove the jets (the two bolts with holes in the middle) and hold them up to the light. You should be able to see if they are completely blocked, though there may be some dirt in there you can’t see.
Either way, squirt through with carb cleaner. If that doesn’t clear the blockage, pluck out the bristle of a wire brush and poke it through. Be gentle though – the jets are brass, so are easily scratched. If that doesn’t work, leave the jets to soak in carb cleaner and repeat until you’ve cleared it.
If you’ve got a few older bikes it might be worth buying an ultrasonic cleaner. Depending on the size of carbs, this will set you back anywhere from £100 to £300. They do a lovely job though.
Reassemble the carbs, refit to the bike and test. Hopefully, you’re golden. If not, the spluttering issues are probably down to something else – duff sparkplugs, ignition coils, ignition timing…

If you’re taking the carbs off, buying a carb service kit is a good idea.
Now you’ve cleaned your carbs, here’s how you can balance - or sync motorcycle carburettors.