Insta360 One X2 review | The best way to film a motorcycle


By John Milbank
Consumer Editor of Bennetts BikeSocial
01.11.2021


Date reviewed: November 2021 | Tested by: John Milbank | RRP: £429.99 | www.insta360.com
Capturing great footage on a motorbike can be tough; where do you put the camera for the best angle? Do you film the road ahead or you the rider? What happens if your mates are riding next to you, and you want to capture them?
The way I produce road test videos means it’s just me and the bike (or sometimes multiple bikes and riders), but no videographer to help me get the shots. That used to mean finding secure but interesting places to mount my GoPros, swapping them around repeatedly to ensure I got enough variety for the video.
Getting an Insta360 One R changed all that, and you can read the review here, though it has had some significant updates again since I wrote that. It wasn’t perfect, but it transformed how I work, making it a lot quicker and easier to get great shots, and to film multiple angles in one pass by selecting the view I wanted in editing; a 360 camera films everything around it, so you can choose the angle you want after the event. It takes some getting used to, but it really is a game-changer.
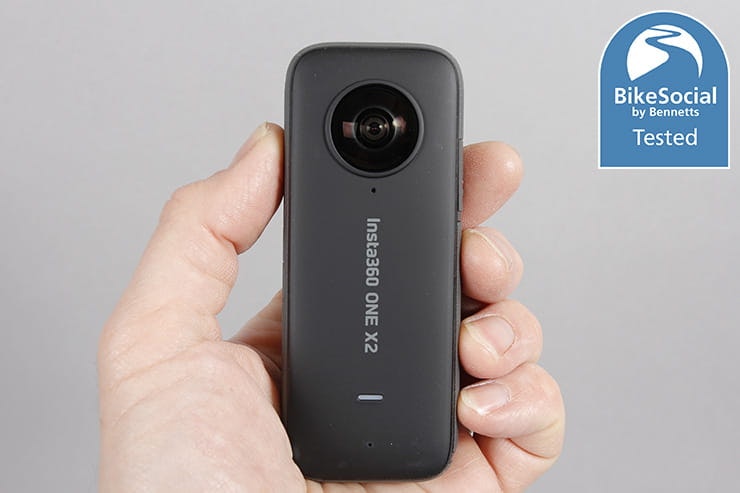
And now the Insta360 One X2, which isn’t a replacement for the One R, and doesn’t have the option of swapping lens modules out, has made life even easier thanks to a better form factor and far easier access to one-touch recording.
I’ve been using the One X2 on a wide range of bikes in all weathers, and while there are things to be aware of (and it’s not cheap), this is why I think anyone who wants to get the best biking footage, be it for a YouTube channel, social media or their own collection, should seriously consider this camera…
Incredible footage is easily achievable
Very easy to operate
Great audio
Lenses are vulnerable
Additional steps in editing
Costly, especially compared to the One R

I’ve tested Insta360’s motorcycle bundle
Features and accessories included
At £429.99, the Insta360 One X2 comes with the camera, charging cable, a fabric protective pouch and a lens cloth. The price is – at the time of writing – fairly steady across all outlets (it’s 99p cheaper on Amazon), but there are often special offers, so keep an eye out.
I reviewed the Motorcycle kit version, which retails at £501.89, though it’s worth noting that most of the parts are available separately. Here’s what you get extra:
32GB MicroSD card
Silicone lens cap
Invisible selfie stick
Motorcycle mount bundle
Buying direct from Insta360, the lens cap is worth £5, the invisible selfie stick is £14.90 and the motorcycle mount bundle is £40. A 64GB MicroSD card costs £15.99 from the same store, which is a good price and not much more than the cost of a decent 32GB card from Amazon. That’s a total value of £75.89, so you’re only saving £3.99 buying the bundle, and the motorcycle mount kit might not be worthwhile…
While I’d consider all the other accessories to be vital, many users will be able to make use of their existing Go-Pro compatible mounts, buying any odd bits extra they need.
The clamp is very handy for mounting the camera quickly to the handlebars, but the thread stripped in mine after about two months of use. Perhaps I was too heavy handed, but swapping rapidly between bikes it let me down, and as it’s not a metric thread inside, I haven’t yet got round to trying to repair it. The kit also doesn’t come with any flat adhesive mounts (only curved), and there are no 90° adaptors that can be essential between the camera and the mount when fixing to a screen, for instance.

The SmallRig frame is nicely made, but adds unnecessary weight when used on a motorbike
I’ve also tested the £20.99 mic adaptor, more of which is discussed below, and the £49.99 utility frame. This is made by SmallRig and is a lovely, anodised aluminium construction, though I wouldn’t consider it an essential for many riders as the frame adds weight that you might not want when the camera’s hanging out on the end of the selfie-stick. But it does have integrated drop-down Go-Pro mounting lugs and two cold-shoes, so for a vlogger wishing to mount a mic and perhaps a small light, it could be worth having. I’d have liked to have seen a ¼” tripod socket on here, to screw in the selfie stick as a handle, but as it is you’ll need to use an adaptor for the GoPro mounts. A T-piece is also supplied, which fixes onto one of the cold shoes for horizontal clamping (not that the orientation of the camera matters, of course!). The microphone adaptor does still fit into the frame.


The mic adaptor allows you to plug a lavalier microphone in directly, or radio kit, and it’s here the cold shoe adaptor could be handy if you have the Rode Wireless Go
I’ve also got the £20.99 (currently £16) One X2 Cold Shoe adaptor that’s designed specifically for mounting the Rode Wireless GO microphone (without the frame) – cleverly, this tucks between the selfie stick and camera body, to mount the mic transmitter to the side. I use Rode Filmmaker kit, so it doesn’t work with this but it’s a neat solution that comes with a short cable to plug into the mic adaptor (that you’ll also need). Insta360 says that this setup makes the transmitter completely invisible, so you can have a lavalier mic attached to your chest with no wires or equipment visible… impressive.
Finally, I have the £54.90 GPS Smart Remote, which deserves its own section…
Is the Insta360 GPS Smart Remote worth buying?
Overall, Insta360’s accessory prices are pretty reasonable, and while the GPS Smart Remote is £54.90, it might be worth it, depending on your needs.
It’s designed to work with the One X2, One R or One X and allows you to control the camera remotely (the clue’s in the name). This can of course be very handy if the camera’s out of reach, but be warned – pressing the square button changes modes, so you could easily switch into timelapse, for instance, and not notice. The mode is displayed on the remote’s screen, but when you’re riding, the last thing you want to do is study this.
The remote comes with a clamp that snaps onto the selfie stick, but it also perfectly fits Yamaha Tracer 9GT mirror clamps (though it’s too small to fit most modern bars). Alternatively, you can strap it to your wrist using the supplied silicone case, but the strap’s too small to fit around bike kit, yet too long to go around the bars easily. Check how you think you’ll use it, because it does have one other useful feature…


The remote’s built-in GPS allows you to record your ride, displaying direction, a basic route map (great on track), elevation, speed, latitude/longitude and gradient. You can choose which of these you want on your footage, though unfortunately – at least at the time of writing – you can only embed it onto your clips if you edit on the phone app, which I find less useful than the desktop app. This GPS data can also be recorded without the remote, if you keep the smartphone app open and connected to your camera.
The camera has to be turned on to be controlled by the remote, but it will last four hours in standby mode, so it’s not rinsing the battery too much, and I only noticed about a 10% reduction in recording time with the remote connected.
With line of site, I can get a good 25m range from the remote, but turn away from the camera to shield it with your body and that drops significantly. A single partition wall is okay, and I’ve sometimes been able to get control through a brick wall, but for controlling the camera on the bike you’re riding, you shouldn’t have any problems.
Charging the remote is done via a microUSB cable, so it’s a shame it’s not the USB-C of the camera, though a full charge easily lasts at least two full camera batteries.
It can be a bit of a fiddle to pair in the first place, but make sure you follow the instructions online to update the camera’s firmware if necessary, then turn it on, then the remote. Reset the remote by pressing both buttons together than go to ‘Bluetooth remote’ in the settings on the camera without the app connected.
I can get away with starting the camera then leaving it running for a lot of what I shoot, but if you need to be able to turn the camera on and off remotely, this is well worth having, just check where you’ll put the remote. And of course, if you want that stats data on your video it’s easier than having your phone app connected via WiFi while filming.


The clamp that comes in the motorcycle mounting kit proved great when clamping to the bars (and the view stays steady regardless of how you turn them), but I broke mine
Ease of use
When you first get the camera, you’ll need to download the app to your phone (for iOS or Android), then once it’s paired it’ll update and you’re ready to go.
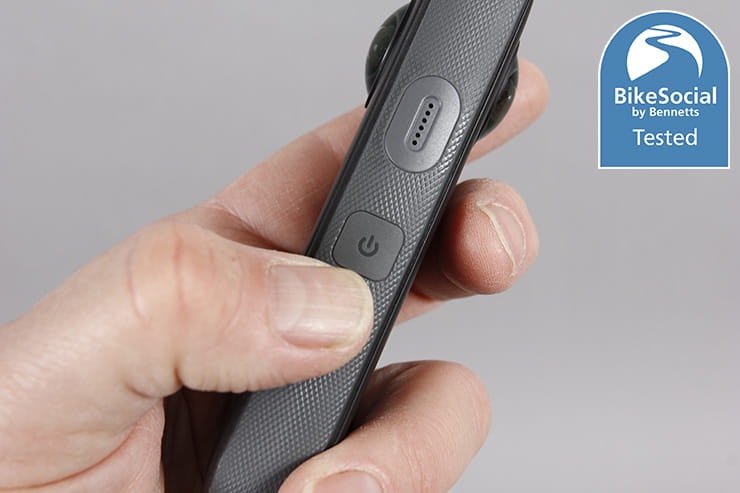
One-touch recording was introduced a while back on the Insta360 cameras, but the button position on the One X2 is much easier to get to with gloved hands than on the One R, so whether I’m using this, or my wife is running the camera while sat on the back of the bike, it’s very easy to grab it, press one button and have it power up then start recording in just under six seconds. Press the button again and it stops recording then shuts down.
It really couldn’t be easier, and the fact that you don’t really need to worry where the camera’s pointing means you can be sure you’ll capture whatever you want. I was filming a ride in Wales and even managed to pan to track a low-flying jet using the editing software.
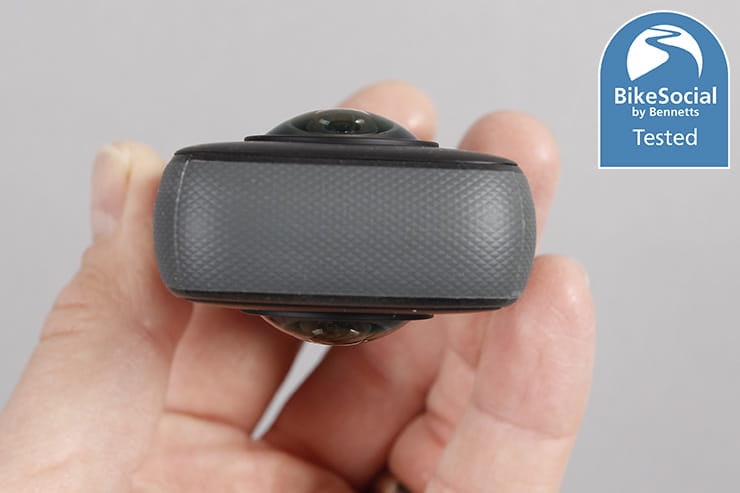
The only thing you really need to be aware of is that anything within a meter or so of the camera will be lost in the centreline between the front and rear cameras. It’s stitched brilliantly outside of this, but you might see the odd ripple. If the camera is on the bars – for instance – you can film a huge field of view to the front and rear but you might lose the mirrors and the ignition barrel, so just consider the main points of interest when positioning the camera. If you know you want the mirrors in, rotate the camera so they’re seen.
Insta360 One X2 interface
The small round screen on the camera gives a surprising amount of information, it can be scrolled at a touch to check what the camera’s seeing, and it’s fairly responsive; if anything, I found it a touch easier to use than the larger screen on the One R, as the scrolling was smoother. Overal the One X2 is also faster in operation than the One R.
The camera can of course be controlled by the phone app, where you’re able to pan around and get a really good idea of what’s seen.
Insta360 One X2 mounting options
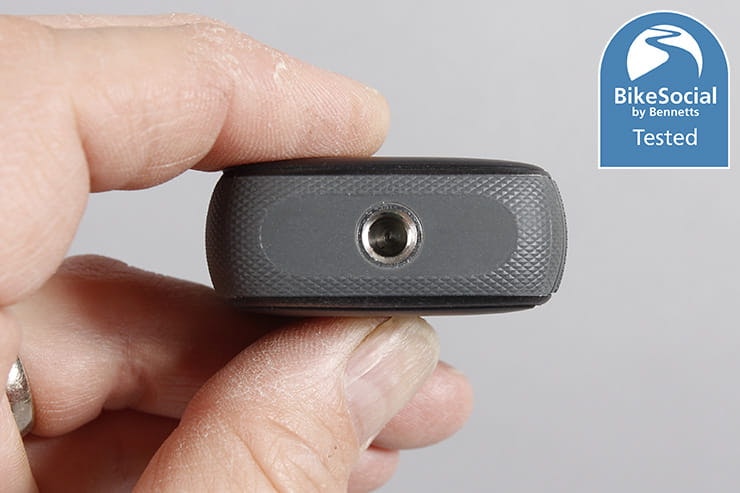
The camera has a built-in ¼” tripod thread that a selfie stick (or tripod of course) can screw into, or use an adaptor to pop GoPro mounts on.
Mounting is incredibly easy as the camera pretty much captures everything, so you’ll find it very versatile.
My most common mountings with this are using a selfie stick zip-tied securely to the rear grab rail, or across the tops of the forks, but you must of course be very careful that you don’t fowl anything on the bike, and that the camera won’t get caught in bushes / other traffic / pedestrians!
By having the camera out and away from the bike, it’s as if the camera is flying alongside it; we used to spend a lot of time and money on having a cameraman dangerously hanging out of the back of a car to get the kind of footage I’m achieving with the Insta360, so this has saved a fortune in just a couple of jobs.
Ultimately, it’s a lot of fun coming up with new mounting positions for a 360 camera, but I also find it saves a lot of time, and gives great results.
But… all 360 cameras have exposed lenses, and once you scratch one, you’ll see the sun glinting off it if it’s deep enough. I accidentally ran a 360 One R through thick bushes, and while the camera was still usable, in the right light you can see the scratch. On that camera you could replace just the dual-lens module for £179.99, but that’s not an option with the One X2. You can buy lens covers, but I’ve not been able to try them, and they will cause some restriction to the field of view, as well as potentially impact the image quality to some extent.
Of course, another advantage of being able to edit the viewpoint after filming is that you can put the camera at the side of the road and ride past, then pan in post-production, giving the impression of a videographer standing there.
Build quality
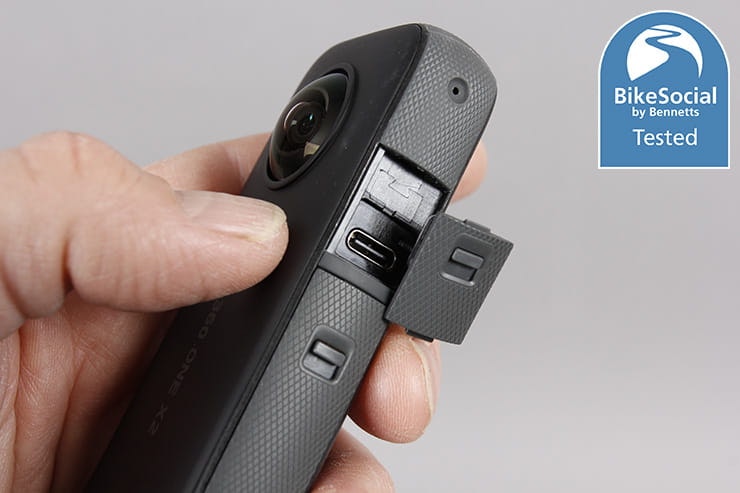
The vulnerable lenses are always going to be an issue on any 360 camera, but the overall build quality of the Insta360 One X2 is excellent. The camera has a solid feel with quality plastics and good locking mechanisms that are easy to use on the battery and USB covers.
Is the Insta360 One X2 waterproof?
Insta360 claims the One X2 is IPX8 rated and waterproof to a depth of 10m. I’ve submerged it in the sink and, more importantly, used it in very heavy rain at motorway speeds with no problems at all.
Insta360 One X2 vs One R vs Akaso vs GoPro vs Techalogic

Video and audio quality, waterproofing and much more… which should YOU buy?
Insta360 One X2 video quality
The Insta360 One X2 is a 5.7K camera, which sounds incredible, but that’s filming everything. Really – everything.
In reality, that means you get a wide field of view wherever you point the camera in the edit; you can zoom in, but go too far and the quality starts to drop off… this is not like setting a GoPro to 4K knowing you can crop in later for a 1080P video.
If you set the One X2 to ‘standard’ filming mode it’ll use just one lens and give a wide angle, stabilised view with a resolution of either 1920x1080, or 2560x1440 (just under 2.7K).
While the BBC world service and plenty of other pro teams use GoPros, they’re only just broadcast quality; technically the Insta360 isn’t really, but it’s still very, very good.
Look at the sample footage in the video to get an idea, but I’ve no problems at all with the quality of this camera. I own a GoPro Hero 7 that can film higher frame rates at much higher resolutions, but I just don’t use it on the bike anymore.
When shooting 360 footage at 5.7K, there are options for 30fps, 25fps and 24fps, giving a good spread for standard filming (I prefer 25fps as it makes for a simple to work with timeline).
Dropping the resolution to 4K gives 50fps, while 3K introduces 100fps, but resolution here is really dropping. In ‘standard’ mode you can shoot at 50fps or 30fps so this isn’t a camera to get if you want to shoot slow-mo footage. If that’s important to you, consider the One R Twin Edition, which is £439.99. With just £10 more getting you that extra versatility of a swappable single lens module that can shoot at up to 200fps 1080P, it’d be the one to go for if you need it.
I’ve noticed no obvious or consistent difference in the video quality between the One X2 and the One R in 360 mode.
Insta360 One X2 audio quality
I’m very impressed with the audio from the One X2. Wind noise at a standstill is well controlled and allows decent speech, while in shelter it’s very good. I’d say my GoPro Hero 7 has the slight edge in speech quality as it sounds a little less processed, but I’ve no problem with the One X2.
On the road, the Insta360 is incredible – wind noise is eliminated almost entirely at speed, and while it’s not that much, you can hear some of the engine. A recent update has made the One R pretty much match this (sounding slightly better even in some circumstances). Slow down through villages and the sound of birds tweeting can be heard. Compared to my (admittedly dated now) GoPro Hero 7 it’s a lot better; you can happily listen to a ride at high speed with the OneX2, and If you want to use a remote mic, that £20.99 adaptor is worth having. And it has a USB-C port, so you can still power the camera with a mic plugged in. Audio quality is very good, so if you need that facility, it’s worth the investment.

Insta360 One R battery life
With a full 1hr 28mins of filming time, the Insta360 One R has plenty of battery life for me to get an entire day filming everything I need for a road test. The One R gave me 58 minutes with the standard battery, which was fine for me, but this is an impressive boost.
Ease of editing footage
It is possible to edit with ‘raw’ 360 footage in pro desktop software, but so far I’ve found it clunky; far better is to use the free Insta360 Studio that you can download for Mac or PC here. This has recently been updated and is even easier to use, but the main thing most riders will want to know is that you can load dozens of clips into it in one go, set your viewing points for each (often just pointing it in the one direction, ensuring ‘lock direction’ is on and setting a single keyframe), then export it. You can work on other clips while they all slot into an export queue, so while this does add an additional stage of editing to any filming you do, the impact is well worth it for the reduced shooting time and the incredible angles. And importantly, you can set a clip to export, change the view and export it again, even before the first has rendered, meaning one ride can give deliver several different shots.
Video clips are up to 30 minutes in length, which is more than enough for anything I’ve done, though film longer than that and you will notice a gap of a few seconds between the end of the first clip and the start of the second.
Little things like the space bar not starting and stopping video mean the desktop app still isn’t quite perfect, and it can take a little getting used to, but you’ll soon be blasting through footage before incorporating it into Premiere Pro, Final Cut, iMovie, PowerDirector, Davinci or whatever editing software you use.
Of course, you can also edit clips in the app on your phone, and either save them on the device or upload them direct to social media. There are loads of options that are in the desktop app here, like automatic tracking – as well as plenty more – but I find this a bit fiddly and annoying.
It's important I stress here that I’m not attempting to create a complete guide to everything this camera can do – there are plenty of videos on YouTube of people showing tiny planets and drone effects – I want to add what YOU need to know as a rider if you’re thinking about buying one. If you want to dive deeper into the other features, Ben Claremont’s videos are some of the most useful and unbiased on YouTube.


The selfie stick extends so far I can’t fit it in my mini studio setup
Ease of updating firmware
The camera is upated automatically if there’s new software the next time you connect to the app, so it’s quick and easy to do, though you can also manually update it by downloading from the website.
Insta360 has so far been very good at getting useful updates out, including the desktop and mobile apps.
Three alternatives to the Insta360 One X2
Choosing a 360 camera is quite a step from a typical action camera, and it’s a big investment. There are limitations but there are also a huge number of advantages…
The Insta360 One R is the obvious current alternative, and it can be had for £10 less than the One X2, though if you buy it with the single-lens module as a Twin Pack it’s only £439.99, which is great value for money. You can also get an impressive 1-inch sensor module. I didn’t find the single lens module to be as good as a GoPro, so keep that in mind, and it’s not quite as good a form factor as the One X2. But it does ‘only’ cost £179.99 to replace the 360 module if a lens gets damaged. Read the review here.
While I’ve not tried it, the GoPro Max costs £379.98 if you sign up to the GoPro subscription for free for a year (you can cancel it). Worth a look, but check out Ben’s videos to see what would suit you best, and keep in mind it doesn’t appear to be as good as the Insta360 One X2 or One R.
Do you really need a 360 camera? The GoPro Hero or the Osmo Action make for good action cameras, but you won’t have the ease of getting truly stunning angles. If you definitely want a 360 camera, but aren’t convinced by the Insta360 yet, check out this video.
These are just three of many alternatives – you can find all the action cameras and other tech we’ve reviewed here, plus be sure to regularly check for the discounts available through BikeSocial membership.

Buying the camera along includes a neoprene pouch to protect the lenses
Insta360 One X2 review: Verdict
If you’re clumsy, or simply can’t be bothered to look after your kit, don’t buy a 360 camera. However, I’ve used this at high speed on a variety of bikes in very hurried shooting conditions and I’ve had no issues. Use the silicone cover (making sure it’s clean), and be careful, and you’ll have access to one of the most incredible pieces of camera kit I’ve ever used.
There’s a huge amount of fancy tricks you can do with the Insta360 cameras, and you can have a lot of fun experimenting, but the simple fact that this allows you to get multiple shots in one pass, with some absolutely awesome angles, means I wholeheartedly recommend it.
Insta360 seems to have become a big name very quickly, but it’s proved itself to be a real serious player in the action camera market. If you have the money and can use even a fraction of what this is capable of, my only hesitation would be questioning whether you should go for the Insta360 One R instead. For me, the form factor of the One X2 makes it better than the One R on a bike, not least due to the ease of pressing that record button, but there’s no denying the fact that you get a lot more for your money with the One R, and greater versatility, and a cheaper fix if you damage a lens. They’re both excellent, so just think about what you want from them and how you’ll use them.
Just as an added note, I've been talking to a pro videographer who found that, with his One X2 mounted rigidly to the frame of a motorbike (using the motorcycle clamp) the camera turned itself off due to vibration in the battery housing during a shoot on track with John McGuinness riding hard. He uses the One R now as it doesn't suffer this, so while it's not something I've ever experienced at all, I wanted to mention it.