Tested: Evotech-Performance BMW S1000 XR crash protection review


By John Milbank
Consumer Editor of Bennetts BikeSocial
17.09.2019


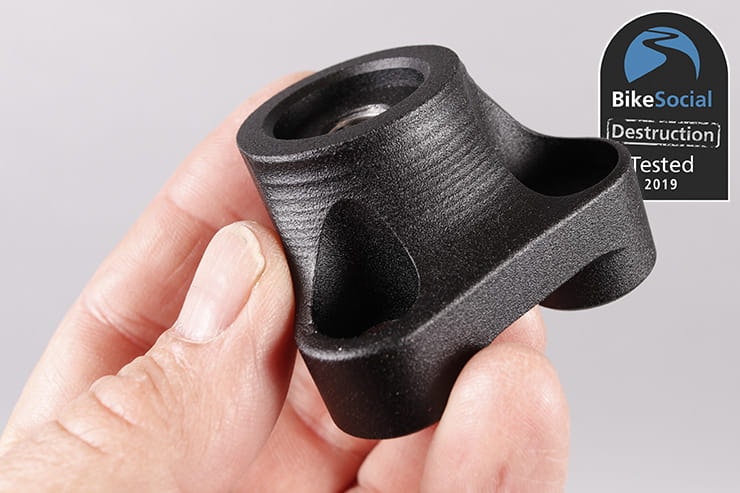
The crash bungs include a beautifully machined offset to clear the water pipe
Date reviewed: September 2019 | Tested by: John Milbank | Price: £35.99 (spindle protectors) £89.99 (crash bobbins) | Evotech-Performance.com
You’d be surprised at the lengths we go to here on BikeSocial to review products like these Evotech Performance crash bobbins. Though as much as I’d like to claim I’m so dedicated that I deliberately threw my brand-new motorcycle on its side, unfortunately it was simple stupidity…
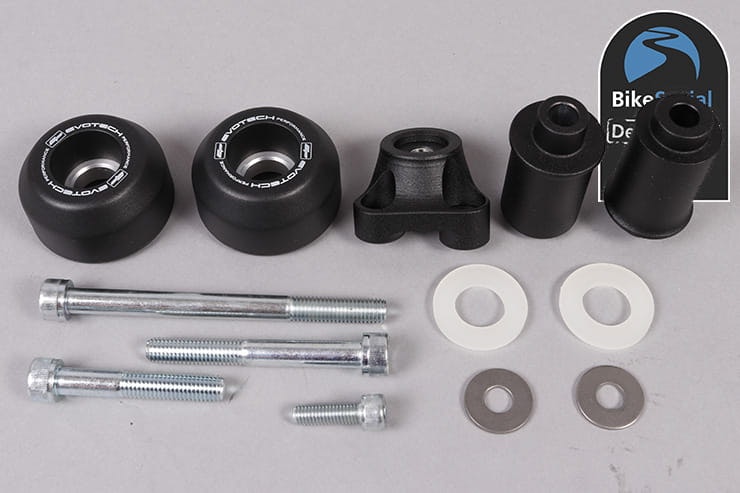
I’ve had the Evotech Performance crash bobbins (£89.99) and front and rear spindle bobbins (£35.99 each) fitted to my BMW S1000 XR since the day after I bought it in early August.


The axle protectors are made of the same materials as the crash bobbins
How easy are the Evotech crash bobbins to fit?
Fitting these crash protectors requires no drilling or cutting of the bodywork – this is generally a thing of the past these days, but it does mean any offsets need to be very solid and well designed. These are.
The fitting instructions are on the product page of Evotech Performance’s website, which does make it easy to check you’re happy installing them before buying, but I’d really like to have a printed guide in the box. You could print the downloadable PDF of course, but I use my iPad in the garage. It would also have helped if the instructions included a parts list with pictures as it would make identifying the correct spacers a bit quicker and easier.
You’ll need the following tools and about an hour to get the crash bungs on:
Ratchet
Torx TX50 driver (for original engine bolts)
8mm hex driver
6mm hex driver
Torque wrench
If you’re short of any tools, remember that Bennetts Insurance customers save on everything at Halfords with Bennetts Rewards.


These bungs replace the engine bolts, and it’s important to only remove one at a time, to avoid the engine shifting. Unfortunately there are no torque settings given in the manual – while finding these for every bike Evotech Performance makes parts for would take them a very long time, it’s disappointing to have to dig it out yourself. Always ensure you’re using the correct figures, rather than picking numbers up from forums. According to the Haynes manual for the BMW S1000 XR, the bolts should be tightened to 60Nm. If you don’t have a torque wrench, you could guess but I really wouldn’t ever recommend it; if in doubt, get your dealer to do the work, or at least ask them to check the tightness for you.
The left bung has a plate that offsets it to clear the water pipe – there’s a 6mm bolt here that screws into a hole in the frame that isn’t used; as there’s no torque data for this in the instructions or the Haynes manual, I just had to make sure it was nipped up tight…
How tight is tight?

Motorcycle instructor Jon Mansfield explains how tight he thinks bolts should be done up
What about the axle protectors?
These really are a piece of cake to fit – while on some bikes a different axle nut is required, here the protectors just pass through and tighten up.
You only need two 13mm sockets to fit them, and the torque setting of 8Nm is given in the instructions (again, only supplied online). This relatively limited tightness means the nylon sliders are able to rotate, which is great if, like me, you want to ensure all the logos are perfectly lined up.
The stainless steel rod that passes through your bike’s axle is threaded at either end – the idea is that the end with the shorter length of thread has the nyloc nut tightened right down, then the other is the one that you take off to fit the protectors. Unfortunately on both sets the nuts were loose – if the long end tightens up before the short is bottomed out, it leaves the rod poking out past the bung, which looks untidy and could snag the tarmac in a crash.
I just gripped the rod in my vice and nipped the nut onto the short threaded end, but hopefully they’ll be tightened fully from the factory in future.


What’s the finish and build-quality like?
From the moment you open the superb (recycled and recyclable) packaging, you expect good quality from this Evotech kit; designed and made in the Lincolnshire factory, the company even has its own highly clinical powder-coating production line.


The matt black finish with understated logos helps the parts blend into the bike extremely well, while the aluminium sections inside the bungs look very classy. This is impressively designed and machined kit, looking in keeping with most motorcycles’ OE materials.
How to protect your bike from a crash

What protection do you really need? PLUS – how to spot a bike that’s been crashed.
Do these crash protectors work?
Whenever you’re fitting crash protection, you can get a rough idea of what’s going to be kept safe by looking at what would support the bike in a crash, but ultimately you still need to trust that the product designer has got it right. And here they certainly have.
When I paddle my bike backwards off our drive and down the drop-kerb to the road, I always do it in first gear with the engine running (in case I lose my footing and have to drive forwards), and I stay straight until I’m on the flat. It’s not a steep drop, but it’s enough to mean I can’t keep balance if I turn the wrong way on a tall machine.
This time I was talking to my wife and daughter; the engine was off and I turned to the right. It was all very slow – I ended up on tip-toes with my left foot right in tight against the bike and couldn’t hold it. I yelped as I tried to save it, my daughter looked panicked and my wife did a weird hesitation dance back and forth. Then I fell over and rolled into the road. Fortunately I don’t think my neighbours saw (I couldn’t hear them laughing).


This was the first vehicle we’ve ever bought brand new, and I’d chucked it on the ground.
Once I’d remembered to take a picture, I tentatively lifted it. The indicator had a slight scuff on the tip and the Evotech weighted bar-end was scuffed a little, as was the hand guard. The belly pan had a tiny mark on it, but the painted main panel was immaculate. The real damage was all on the crash bung.
The axle protectors didn’t touch down in this drop – that’s not to say they’re unnecessary as in a slide the edge of the fork bottoms or the swingarm could get caught, but without the £89.99 Evotech-Performance crash bobbins, the fairing panel would have been damaged, and it’s likely the indicator would have suffered much worse.
Checking with Sycamore Motorrrad, the fairing panel would have cost £266 to replace, and if the indicator had been damaged more, it would add £37.80. As it is, I can happily live with the few very small marks on the bike, and I’ll just be spending £17.93 including delivery for a replacement crash bobbin head. Of course, if I’d gone down on the right the exhaust would have been marked, but there’s little I could do to protect that.
When I bought this bike it was the most money my wife or I had ever spent on anything besides our house, and I didn’t take it out until I’d fitted the crash protection. I hoped I’d never use it, but thank goodness it was there!

A replacement crash bobbin head costs just £17.93 with delivery