Tested: Yoshimura Carbon RS-2 Exhaust (Honda MSX125 / Grom) review


By John Milbank
Consumer Editor of Bennetts BikeSocial
25.04.2018


Date reviewed: April 2018 | Tested by: John Milbank | Price: £528 | www.performanceparts-ltd.com
Known as the Grom in America, Honda’s MSX125 has a real cult following, owners looking to tune as much as possible from the little single-cylinder machine. This is far from a cheap bike, costing £3,349, but ride one, as there’s a good chance you’ll understand why even experienced bikers suddenly discover a desperate urge to find space in their garage for a ‘Mini-Street Xtreme’.
Yoshimura’s RS-2 is one of the most popular premium-quality exhaust systems, and is claimed to give increased performance with no fuelling adjustments. I’ve fitted it to my project Africa Grom, which is a tribute to the Africa Twin. As such, it might seem odd to have chosen a low-level pipe. While Yoshimura only produces high-level systems for the previous model, there are others available, and it is possible to fit a high-level to the new bike, with some modifications to the underside of the tail to hang the can from.
Obviously I’m not going to be riding this bike over the kind of terrain the real Africa Twin can tackle, but I do intend to explore green lanes on the little machine. A high-level exhaust would put the end of the can out of any water, but I don’t think I’ll be wading much on this. More importantly, the sweep of the Yoshimura’s header pipe as it leaves the cylinder is not only the best-looking I’ve seen, it’s also more compact and better angled than some of the alternatives, meaning that if I hit something from the front, it’s less likely to do any serious damage to the pipe and cylinder head. It’ll also give me more space for a bash plate, which I’m in the process of making, and Nathan Millward – a highly experienced round-the-world adventurer – rightly pointed out that I can carry more luggage with a low-level can. He’s right; I now have two Kriega OS-12 packs fitted to my home-made racks.
 review")
 review")
 review")
 review")
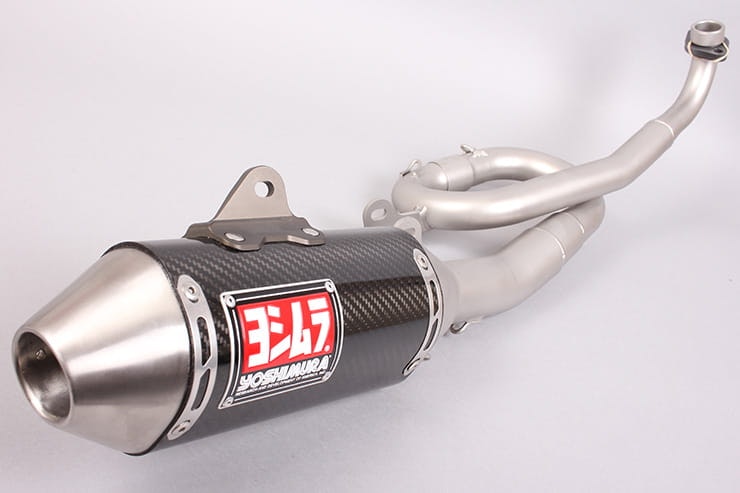
The overall finish is extremely high on the Yoshimura RS-2 exhaust
Construction
The standard Honda exhaust is a one-piece system, the header pipe running down into a large collector box, then up into the pipe. The Yoshimura is two-part, designed and built in the USA with stainless-steel headers and a carbon can, which has stainless and anodised alloy fittings.
It’s absolutely stunning, with perfect welds and very, very thick carbon. Cheaper exhausts can sometimes have a weaker body, and can blow out their packing, but there’s certainly no risk of that with this system. And it’s the little details that really please, down to the connecting springs, which have small rubber Yoshimura-branded covers.
The standard exhaust was fine when removed, but the bike hadn’t done many miles, and being pressed steel it’s vulnerable to corrosion, especially when it’s got a few scuffs on it through over-enthusiastic riding (ahem).
 review")
 review")
It’s the little details that really count, like the branded springs and header clamp
Weight
The Yoshimura RS-2 end-can weighs 1219g, while the header pipe is 963g. The springs add a further 111g, making a total of 2293g. If you use the baffle, the weight creeps up to 2371g.
The standard exhaust weighs 4340g.
A one kilogram saving might not sound huge, but that’s about a quarter of the entire OE system, and on a machine making so little power, and only weighing 101.7kg ready to ride, it all counts.
Fitting
Clear instructions make fitting easy with a few fairly basic tools. A spring-puller is included, and I got the original off and the new one on in around half an hour while the bike was still strapped to the dyno at Chris Walker Kawasaki in Lincolnshire.
 review")
Fitting the exhaust is easy with just a few basic tools
Sound
I’m not a massive fan of loud exhausts anymore; I’d rather people didn’t hear me coming (especially if they have a speed camera), and frankly I don’t think non-riders need more excuses to moan about us.
But the MSX brings out the child in me, and having something this small packing such a loud bark just makes me grin. With the baffle out, my wife says it’s too loud – pop it in and the sound is muted a bit, but I still wouldn’t suggest you fit this system to a bike that you commute on at the crack of dawn; your neighbours won’t thank you.
A loud exhaust can get tiring on long journeys, but you wouldn’t generally do many on a bike like this. I tend to ride it with the baffle fitted – especially on green lanes – but will pop it out when I want to make sure everyone in the office knows I’ve arrived.
 review")
The baffle is nicely made but a royal pain to remove
The baffle is the only part I think could have been slightly better on the exhaust – it looks great, and is very well made, but it’s really hard to get in and out. I had to use the supplied spring puller to tug it free, but that eventually snapped (I was gutted, as I was proud of my ‘full-factory’ Yoshimura puller), so had to revert to my home-made puller, fashioned out of a wire coat hanger. It’s not clear where the baffle snags most in the end of the pipe, and unfortunately there’s nothing I can do about it, beyond grinding away the inside edges of the can.
The exhaust is not E-marked, and being made in America it comes with a sticker on the back of the can saying it’s for off-road use only in the States, as it does not conform to US EPA noise emission standards.
Yoshimura sound comparison

Listen to the original and Yoshimura systems (with and without baffle) on the road and dyno
Performance
On the dyno at Chris Walker Kawasaki, the standard MSX125 made 8.55bhp (6.38kW) @ 6,450rpm and 7.98lb-ft (10.82Nm) @ 5,040rpm (Honda claims 9.65bhp @ 7,000rpm and 8.04lb-ft @ 5,500rpm).
With the Yoshimura RS-2 exhaust fitted and the baffle in, peak power increased slightly to 8.76bhp (6.53kW) at a later 7,950rpm, but peak torque dropped a fraction to 7.72lb-ft (10.47Nm) @ 5,200rpm. Looking at the dyno chart below, you can see that under around 6,400rpm, power and torque are fractionally down on standard (the green line) with the baffle in the Yoshimura (the red line). But above this, things switch around, and the engine is able to breath more freely and deliver higher performance all the way to the limiter, just before 9,000rpm. This is noticeable on the bike – it feels like it can get to its top speed that bit easier than with the more restrictive OE system; a good example of why peak figures don’t tell the whole story.

 review")
With the baffle removed (the blue line), the bike is a little more eager still, though again I wouldn’t say the top speed is much different using the standard final drive ratios at least; the increased willingness could see a smaller rear sprocket (or larger front) deliver greater top speed more easily, but it’d of course be at the expense of acceleration.
Peak power is up to 9.18bhp (6.85kW) @ 7,990rpm, and torque hits 8.08lb-ft (10.96Nm) @ 5,140rpm. You can also see from the chart that the figures are up throughout the rev-range, making the fully-open RS-2 the best option if you want to tease out the most performance without having to adjust the fuelling or start altering the compression ratio and cam timing.
Fuelling
If you look at the fuelling section at the bottom of the dyno chart shown above, you’ll see that the OE exhaust appears to be running extremely lean. This is simply because the ‘sniffer’ pipe from the dyno couldn’t get an accurate reading – if that figure were correct, the engine would be in real trouble!
A dyno technician will typically be aiming for a figure of 13 parts air to one part fuel – more than this and the engine is lean, will run hot and potentially suffer damage to the valves. Less than this and it’s rich, which is inefficient. Most modern bikes these days are on the lean side as standard, so you do need to be careful if you make any changes to your bike’s intake or exhaust.
Modern ECUs take information from an oxygen sensor in the exhaust (it’s fitted to the side of the cylinder head, analysing after the exhaust valve on the MSX125) to monitor the air-fuel ratio, so can – to a limited extent – adapt the fuel mixture going into the engine for optimum performance and efficiency. This is in what’s called a ‘closed loop’, and doesn’t always affect the entire rev range. And it can only go so far.
Forums are awash with posts explaining that the MSX125 (or Grom) ECU needs resetting after the fuelling is adjusted, and that it’ll allow the engine to run perfectly after any modifications. It’s also said that the ECU will sort itself out after 20 on/off cycles.
Sceptical of this ‘quick fix’, especially with no dyno figures to back it up, I tried resetting the ECU. And it worked.
 review")
 review")
Resetting the Grom’s ECU (or ECM) did have an effect on the air/fuel ratio, and dyno technician Joe was happy with the results
The fuelling of the bike with the fully-open Yoshimura system fitted was recorded on the dyno immediately after fitting – the peak was 16.82:1. The bike was then stopped, and I reset the Grom’s ECU before running the bike again.
At the next run, the fuelling trace had dropped much closer to the optimum 13:1 ratio, with a peak of 15.28:1. Overall, it’s still running slightly lean, but Joe, the ex-BSB mechanic and dyno-operator at Chris Walker Kawasaki, said that he was happy the fuelling at this point was safe.
While clearly the reset did work, we haven’t tested it on other exhausts for the Grom, so can’t be sure of the degree of latitude the ECU has. It can certainly mess with tuning though – Tim Welch of Yoshimura USA told me that, when the team was race tuning a Grom beyond an exhaust replacement, the fuelling maps they were using kept being overridden by the ECU. Only by fitting an ‘02 eliminator’, which bypasses the oxygen sensor, would the little Honda stop trying to ‘correct’ the fuelling and dramatically affect the rideability.
I asked Honda Japan (via Honda UK) what latitude the ECU (or ECM) has, and whether it does indeed reset itself after 20 cycles, but they wouldn’t comment. What is clear from the workshop manual though is that a reset should be carried out if the idle air screw, fuel pump, fuel filter, fuel injector or 02 (Oxygen) sensor is replaced. It’s also important to carry out a reset if the cylinder head, valves, valve guides, valve seats, cylinder, piston or piston rings have been overhauled or replaced. Instructions on how to carry out a reset are at the bottom of this article.
 review")
Verdict
True to Yoshimura’s promise, its exhaust does indeed give a performance increase over stock. It might not be much, but we’re looking at low levels to start with; the fully open system gives the Honda MSX125 (Grom) a 7.73% increase in power and 3.17% increase in torque. That’s not bad, but as always, it’s not the full story – you always need to see how a bike makes its power before judging, and the charts clearly show the motor is able to breath more freely.
It is loud, especially for something so small, but while I generally don’t buy into the ‘loud pipes save lives’ argument, filtering through busy city traffic on something so diminutive is less nerve-wracking now!
My only niggle is the real difficulty in fitting and removing the baffle, but otherwise this is beautifully made exhaust system that really transforms the bike.
 review")
Thanks to the team at Chris Walker Kawasaki for the use of their dyno while testing the Yoshimura exhaust.
The shop features a fully-equipped workshop and separate dyno area, which can both be viewed through large windows at all times. There’s a great café that offers a perfect stop while riding some of the popular biking roads around Grantham (come in on the A607 if you can), and you’ll find all the new Kawasakis for sale, as well as a range of kit, accessories and used bikes, not to mention some stunning classic and modern race machines.
If he’s not racing, you’ll likely see Stalker himself working at the shop (ask him if he’ll start his H2R for you), and there’s even a free two-player sit-on Sega Manx TT Superbike arcade game… well worth a visit!
 review")
 review")
 review")
How to reset the Honda MSX125 (Grom) ECU/ECM
To reset the Grom’s fuelling, locate the blanked-off red connector on the right-hand side of the bike, under the seat between the frame and tail plastics, then remove its cover. With the ignition off, locate and bridge the two pins that connect to the blue wire and the green/black wire; there’s a special tool available, but a piece of wire or even a paper clip will do the job. Now open the throttle fully and hold it there while you turn the ignition switch on. The engine management (or MIL, Malfunction Indicator Lamp) should illuminate, then start flashing. After five seconds, close the throttle and wait for more than three seconds before turning off the ignition.
How to delete fault codes from the Honda MSX125 (Grom)
Note that the ECU reset won’t work if there are any fault codes stored. Fault codes would be there for a reason, so we don’t recommend you blindly erase them, but the process is to bridge the blue and green/black wires as before, then turn the ignition on. Disconnect the wires while the engine light (or MIL) is on, wait five seconds, then reconnect them again. If the lamp goes off, then starts blinking, the codes have been successfully erased. If the lamp stays off, the erase was unsuccessful, so you need to try again. Yoshimura exhausts are available in the UK for a wide range of bikes from Performance Parts [https://www.performanceparts-ltd.com]
To reset the Grom’s fuelling, locate the blanked-off red connector on the right-hand side of the bike, under the seat between the frame and tail plastics, then remove its cover.
With the ignition off, locate and bridge the two pins that connect to the blue wire and the green/black wire; there’s a special tool available, but a piece of wire or even a paper clip will do the job.
Now open the throttle fully and hold it there while you turn the ignition switch on. The engine management (or MIL, Malfunction Indicator Lamp) should illuminate, then start flashing. After five seconds, close the throttle and wait for more than three seconds before turning off the ignition.
Yoshimura exhausts are available in the UK for a wide range of bikes from Performance Parts