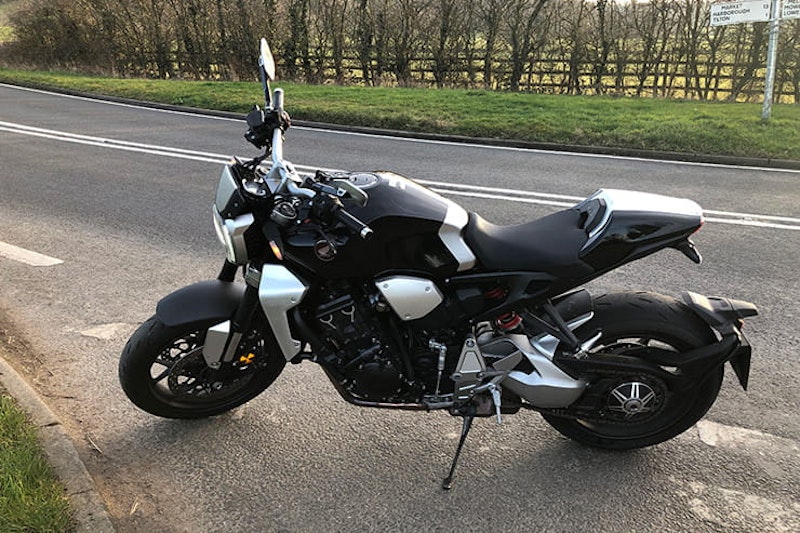
Honda CB1000R (2018) - Long Term Review


By Steve Rose
BikeSocial Publisher
23.07.2018


Part 1 - The First Few Miles
First published 23 July 2018
Honda describes its new CB1000R as a ‘Neo Sports café’ racer. I have a problem with that. The whole café racer thing needs a reboot, but we also need a different name. The legendary Sixties stories of ‘drop the needle on the record, ride from the caff to the flyover and back before the song finishes’ were clearly piffle. Most tuned-up, ton-up Triumphs (and none of those old sixties Triumphs would actually do 100mph, ever, at all, whatever the owner says) would have broken down by the time Mr Cochran had got his blue, summertime case anywhere near the United Nations.
But the legend stuck and, thankfully it only died out because in the 1970s when progressive rock landed, every song worth its wax was a 25-minute jazz odyssey with string section and percussion solo (with gong), meaning even your nan could make the flyover and back on her Puch Maxi.
A few years back the café racer made a comeback. Mischievous hipsters turned unwanted Japanese and German garbage into stylish-looking custom bikes. Adding a 60s-style race seat, some polished alloy and liberally applied exhaust bandage could treble the value of an old and unwanted BMW R45 from 90p to almost £2.70.
Most of the manufacturers saw an opportunity and Honda are the latest to put their tanner in the jukebox. My problem is that this bike is far too good to be called a café racer because that term implies some kind of half-baked style-over-substance nonsense that’ll be horrible to ride, impractical and fall to bits.
The CB1000R is none of those things. To be fair, neither was the previous model, which was a brilliant motorbike that very few people bought. Honda has given us a clue in the new CB’s dashboard, which has a mysterious soft-focus, multi-coloured light display to the right-hand side that lights up like a 1970s northern nightclub. I think that when they said ‘café’ what they actually meant was Neo Sports Disco Racer – the 12” remix version that goes on forever.
Once that clicked, it all made perfect sense.


I love this bike for the simple reason that it is just so bloody great to ride. I know some will dismiss it for only making half a million horsepower, having at least two-too-many cylinders and not having the ‘character’ of a Ducati, Aprilia, KTM or Triumph because it’s a boring four-cylinder Honda. But those people are fools. More often than not what we call ‘character’ is the stuff that Honda simply fixes properly before a bike goes on sale. A lumpy v-twin clattering and banging its chain at low revs isn’t ‘character’, it’s bad engineering. And a gearbox that doesn’t find neutral or suspension that purees your kidneys are not ‘character’ either. They are unacceptable on a bike probably costing more than the entire recording of Summertime Blues and Saturday Night Fever put together. If you were buying a telly I’m guessing you buy the well-developed, fit-for-purpose Sony or Samsung and not some ill-developed, styled-like-a-1980s-Radio-Rentals Ferguson because it has an ‘authentic’ flickering picture, takes twenty minutes to warm up and has smoke coming out of the back.
Sorry. 527 words in and you might like to know what the CB1000R is like to ride. In a word, engaging. If riding Yamaha’s MT-10 is like trying to wash two angry tom cats in a sink, then chucking the CB1000R down a bumpy, twisty road is like polishing your favourite haddock while trampolining. By that I mean largely pointless, not something you’d have considered a few years back, but surprisingly satisfying, if still a little challenging and occasionally a little too bouncy.
Shall we get on with the test?
Engine
On the outside it’s the same detuned 2006-Fireblade motor as in the old CB1000R. Chosen because this version has the longer piston stroke which tends to deliver torque and midrange rather than outright power. This time the detuning is a lot less radical. The old bike claimed 125bhp, but this one, with the benefit of ten years’ advance in ignition and fuel-injection tech can now make 143bhp and a whole load of midrange too. That’s a harder thing to achieve than you’d think because modern sports bikes make much of their power through enormous airboxes and ram air systems. The packaging of a naked bike leaves less room for an airbox meaning power will always be reduced.
No fairing means stratospheric top speeds are left to the owner’s imagination meaning Honda’s engineers could focus on getting the gearing right so the CB accelerates like you’d hope it to and feels strongest between 6-8000rpm, which is exactly where you want it to.
Very quick off the line and the silky, inline four-cylinder delivery is such a pleasure after being force fed nasty, lumpy, rough-arsed twins for most of the last 12 months. Seriously, riding an inline four these days gives an impression of what our dads must have felt when, after all those years making do on twins, Honda and Kawasaki’s four-cylinder bikes showed how it could be done.
This + version has an up/down quickshifter too which is light to the touch, consistent in its behaviour and works exactly like you expected a quickshifter would and makes you wonder how so many other manufacturers have the cheek to fit such lousy units to their very expensive motorcycles and expect to get away with it. Should you prefer to shift manually, you’ll also delight in the CB’s lightweight, accurate cable clutch.
It’s a lovely package to use; flexible in town, flexible in the twisties too – I did one 35-mile section of one of my favourite Dales’ roads, swapping between 30-85 mph just in third gear because it felt absolutely right to do it. The fuelling is perfect and, even at running-in speeds it was returning 48mpg.

Chassis
There’s a real nice balance to the CB’s handling. It steers quickly but doesn’t weave or wallow in fast corners. And that, despite having standard suspension settings that are soft enough to bottom out the rear on a bumpy Dales road.
Sitting at the lights in Ripon, bouncing up and down on the suspension it felt very soft and underdamped. I was expecting an interesting ride over the bumps, jumps and lumps of the awesome B6108. But somehow the Honda’s set up kept absolute control of everything. As we turned onto the A684, which is faster, but equally bumpy there were a few moments where the front hadn’t finished rebounding as the rear hit another big bump. This makes the Honda feel lively, but, surprisingly, not out of control. A change of riding style had me steering faster and sharper with the bars to get the lean angle quickly and then balancing throttle, back brake and shifting body weight to keep the suspension more settled. It worked too and the trade-off in comfort from the CB’s soft settings makes this bike faster and more enjoyable than the last few sports bikes I’ve ridden round here.
Once run in, it’ll be interesting to see where the best compromise is in the CB’s settings. It could do with a little more damping control and definitely more preload for my weight, but the standard ride is so comfy it’d be a shame to ruin it.
Brakes
Radially mounted Tokico front calipers won’t win much credibility with your Brembo-equipped mates on their British, Italian and German nakeds, but this set up, in conjunction with the Showa Big Piston forks is one of the easiest I’ve used to get serious stopping power with an awful lot of feel too. The front lever action is sharp, but not worryingly so, getting rid of speed in a powerful, but predictable manner. The rear brake pedal is positioned like only Honda can – somehow, it’s just a few per cent easier to use than so many other bikes – despite the footpegs being higher and sportier than I was expecting - meaning you can make it part of your cornering tools, controlling the bike’s pitch and yaw with a subtle dab.
Comfort
The CB feels small and compact, so it’s surprising to discover that the wheelbase is slightly longer than before and the seat height is a relatively conventional 830mm. The footpegs are set high, for which you are thankful in corners (good ground clearance) and cursing on the motorway because they aren’t really set back far enough, meaning your knees are aching after 90 minutes. One of the big differences though is the secondary comfort stuff. Because the bike is so easy to ride, because everything just works how you want it to, you can go very fast for a very long time on the CB1000R without feeling stressed or tired. It’s like the difference between a £150 crash helmet and a £500 one – on the surface they both do the same job, both have soft linings and lots of vents, but the top-spec Shoei somehow makes life easier and you arrive home feeling fresher. It’s the same with the CB1000R.

Equipment
Four riding modes; Sport, Road, Rain and User. As usual, Sport sharpens the throttle and has least intrusive traction control and ABS settings. And then the bike gets more numb and less fun as you switch down the modes. Unlike Yamaha’s MT-10 where Sport is so sharp that away from a track it becomes annoying, on the Honda it’s probably the one you’ll settle on after your first week messing about and leave it there forever. The others are interesting to try, but make the bike feel considerably less enjoyable while offering no real benefit.
The disco on the rhs of the clocks is distracting and has different coloured lights to show which riding mode you are in, plus an additional eco function that glows green to tell you when you have closed the throttle. It’s hard to think of anything that would be more pointless, but thankfully, while trying to work out how to change riding modes you will probably accidentally switch it off anyway.
This + version comes with heated grips, the up and down quickshifter and a teeny flyscreen.
Price & Value for Money
This + version costs £12,299 otr which is £1100 more than the standard bike. That’s £2000 more than Kawasaki’s Z1000, £800 more than Yamaha’s base model MT-10 or £949 more than a base-model Triumph Speed Triple. For this money you could also buy BMW’s R1200R with conventional suspension, a top box and heated grips. They are all very different bikes, delivering similar performance and handling in their own ways. Hard to say whether the Honda has enough of an advantage (if any) over the opposition to be worth the extra money and what you may view as an advantage, others might not be bothered about.
Honda CB1000R (2018) - Verdict
For what it’s worth, I’d buy the Honda from that crowd above because it’s the best all-round package, easiest to ride fast or slow, has the best gearchange with or without the quickshifter and the strongest brakes too. I prefer things like that to ‘character’ and the disco lights make me chuckle. The Honda feels smaller and easier to manage too and no one does smooth four-cylinder loveliness better than Honda.
I prefer the more conservative design of the CB too next to the ‘look-how-wacky-I-am’ styling of the Kawasaki and Yamaha in particular. The CB1000R strikes a good blend of old-fashioned ‘proper’ motorcycle with a modern twist that is neither retro nor too modern.

Part 2 - Suspension Settings
Updated 14th August 2018
 suspension settings")
Confession time, it’s been thirteen years since I last fiddled with a bike’s suspension. That’s because most bikes have a set-up that’s good enough and I’d rather be riding than adjusting. Plus, my riding is less about perfect apexes and measured control as it is about survival and getting away with it.
The last bike to break that pattern was a 2005 Kawasaki ZX-6R. I was booked on a track day but at the last minute I cancelled (why pay a fortune to ride round the same eleven corners over and over again?) and, instead spent a day turning the Kawasaki’s rock hard suspension into something more capable and comfortable.
Thirteen years on and after 700 miles on Honda’s CB1000R there’s a niggle. I love the way this bike goes, steers and, mostly the way it rides too. But the back end is too soft and on a bumpy road I’ve had the rear shock bottom out three times now. I can’t remember the last time that happened on anything, never mind a premium-priced neo disco racer. So, with a day off, sunshine and a need to get this fixed, I’m heading to my favourite suspension testing circuit.
The B1190 from Horncastle to Bardney won’t feature in anyone’s ‘100 greatest biking roads’ feature. It’s not scenic, not that long and is peppered with difficult, sharp, blind, bumpy and downright nasty corners. It’s challenging but not especially fun. From Bardney, out to Baumber and then back to Horncastle is more open and enjoyable, but still bumpy and taxing on motorcycle suspension. A morning on those two will get me a set-up and then an afternoon on the neighbouring B1183 will help with the fine-tuning.
 suspension settings")
On standard settings the Honda feels ok at the front but very soft at the back. Like the design team spent all their money on the Fireblade-ish forks, so had to fit a budget rear shock to hit, er, budget. Bounce on the seat at some traffic lights and there’s a huge amount of travel with almost no resistance and not a lot of rebound damping either. So it’s somewhat surprising that when you attack some seriously challenging corners with a bit of gusto the CB actually copes really well.
But you can feel it moving about and it does bottom out. Out with the C-spanner, 10p piece and screwdriver - let’s get going.
 suspension settings")
Rear preload
A grown-up would do something called ‘measuring sag’ with a tape measure. Sag is the distance a bike drops on its suspension when you sit on it. So, if your suspension has 50mm of travel and your weight uses up 20mm of that when you sit on the bike, then adding 20mm of preload to the spring will allow for that and means there’s much less ‘bounce’ (a technical term) and less chance of it either bottoming or topping out. On most bikes preload is adjusted by a collar on the shock absorber or a knob on a remote adjuster. Adding preload raises the ride height a little but it doesn’t make suspension stiffer (or softer when you reduce it). Some people confuse softness with amount of travel.
The CB1000R’s rear preload is set on position two out of eight. The approved ‘Rosie method’ of adjusting it is to increase the preload and then sit on the bike. When the bike only drops a small amount (another technical term), there’s enough preload. I suspect that Valentino’s technicians use something more complex, but they’ve got all weekend – I have to be home by four.
Adding a couple of clicks makes a big difference and the ride quality is still good. The bumps that bottomed out the shock half an hour ago are felt, but nothing more. Adding a couple more clicks (position six out of eight) means the bike now sits taller at the rear, only sags a tiny bit and is steering a little quicker too.
 suspension settings")
Front preload.
Unless you sit on the handlebars the front end of a motorcycle rarely drops like the rear. On the Honda it feels roughly ok, moving the same on standard settings as the rear is now moving after tweaking. I adjust it a little anyway because..., oh, just because… The adjuster is unusual, positioned on the right-hand fork leg, needing either the world’s widest screwdriver blade or a 10p piece to twist it. I give it a full turn clockwise (more preload), go for a ride, tow turns anticlockwise (so one back off standard) but it makes little difference either way – possibly because the damping on the forks is much more controlled.
 suspension settings")
Rear rebound damping.
There are two types of suspension damping; compression and rebound. Compression damping alters the rate at which the spring compresses, while rebound (sometimes called ‘tension’) controls the rate at which the spring extends back.
The Honda only has rebound adjustment at the back and the standard setting is one and a half turns in out of a four and a half turn total. Too little rebound damping means that when you hit a bump and the shock compresses, it springs back quickly like a pogo stick, kicking the rider out of the seat. Increasing the rebound to three turns, adds to the feeling of smooth control from the rear shock. It still soaks up the bumps, but now feels like it responds better and makes the transition from acceleration to braking smoother too as the weight transfer onto the forks extends the rear shock in a more controlled way.
 suspension settings")
Rear compression damping
Even with the preload set it still feels like the Honda’s shock compresses slightly too far and too fast. It needs some additional compression damping, but there’s no facility to adjust it. So, when I hit a big bump or accelerate hard it still compresses the shock quickly. I could add more preload, but instead I start to wonder if there’s anything I can do with the front (which has compression and rebound damping adjustment). In theory adding some rebound damping to the front will slow the rate at which the forks extend when I let the brakes off, meaning less force transferred to the rear, which will help stabilise the bike on the way into a bumpy corner. I try it and it works in as much as the bike feels easier to turn and doesn’t want to run wide (although there might be other reasons for this – see next section). This is the weirdness of suspension adjustment – how much of what you feel is in your mind and how much is real?
Front rebound damping
When I brought my ZX-6R here 13 years ago the lightbulb moment was realising that me running wide in tight, blind corners wasn’t all because I’m a useless halfwit with no talent. Going too fast into a blind corner inevitably means holding the brakes on for longer than you should, which means the forks are compressed. Which is good because this sharpens the steering geometry and helps the bike turn faster. But, at the point you release the brakes the front end has a tendency to spring back up, momentarily turning your supersport race replica into a chopper, making it steer very slowly indeed, which is why you run wide in the corner.
There are two solutions; either brake earlier, release earlier and steer through the turn on settled suspension. Or, add some rebound damping to the front so that when you release the brake the forks extend back slowly and smoothly, allowing you to turn in on consistent suspension.
The knack with rebound is to not add too much. Do this and you’ll affect the ride quality because if you hit a series of bumps the forks won’t have had chance to fully extend back from one before you hit the next and that increases the chances of bottoming out and that is a very bad thing for forks to do.
The CB’s forks have nine and a half turns of rebound adjustment. I start off at four and finish with six and a half – slightly more than needed because I’m trying to add compression to the rear.
 suspension settings")
Front compression damping.
On a racetrack this is especially important because it controls the transition from acceleration to heavy braking. On the road it’s less so because none of us really brake that hard unless it’s an emergency. Compression damping on the road is more about ride quality – controlling the feel over bumps. As an experiment I try full compression, followed by zero compression. The bike’s steering and feel in corners is different, but both settings are ok. The biggest difference is in the way the Honda holds the road. On zero compression it soaks up the bumps better, but feels a little vague and imprecise in fast bends (high speed, not that much lean or transition between braking and acceleration) and a lot more ‘exciting’ (as in involving, feeling more like a sports bike, but not actually going any quicker) in the slow corners because the front dives more sharply and quickens the steering. On full compression, the Honda steers more accurately and wanders less but the ride quality is much more harsh. In the end I admit I don’t really care about the front compression and set it halfway. Somewhere in Honda’s suspension development dept a man in a white coat is crying.
 suspension settings")
At the end of a long day…
The settings I ended up with will almost certainly not be the right settings for you, or you or you at the back. We all ride slightly differently, all prefer different feedback and all prefer suspension to do different things. Even at the very highest levels of Moto GP, two riders on the same bike will use completely different settings to lap a fraction of a second apart. Put one team mate on the other’s bike and he’ll struggle to get within a second.
The key to setting up suspension is to ask the right questions about what your bike is doing and think about the feedback you get carefully.
Make detailed notes of everything you do so you can put it back to previous settings if needed and don’t be afraid to turn everything to full on or full off – most bikes don’t have a huge range of adjustment, so you’re unlikely to wreck it.
Listen to what your suspension is telling you. Think about what the feedback means and remember that the settings you get on one type of road might be different from what’s needed on another one.
So our Honda’s suspension is now much better for me, at least. What was really interesting though was after a couple of hours spent working on the set up with warm tyres and hot suspension oil (the CB doesn’t have a remote reservoir to cool the rear shock’s damping oil), I stopped for lunch for an hour and when I started again the set-up felt stiff, sharp and horrible. The oil had cooled down, thickened up and took about ten minutes back on the b-roads before it was working properly.
The Honda is a road bike and the rear shock is a compromise between comfort and just-about-managing-to-be-sporty. Now it’s set-up I’m happy to ride it fast and it no longer bottoms out (which was the biggest problem) and steers faster too.
 suspension settings")
Part 3 - Toys, Tyres, Track and Tomfoolery
Updated 30th December 2018, Author - Michael Mann


After happy memories of a beautiful holiday romance and a handful of letters later over the following few months, you’re due to meet again. You’re worried, will she be as hot in real life? Will she be as entertaining? Will there be the chemistry? Is Peterborough going to offer the same rush of endorphins as the Rhonda road in Southern Spain?
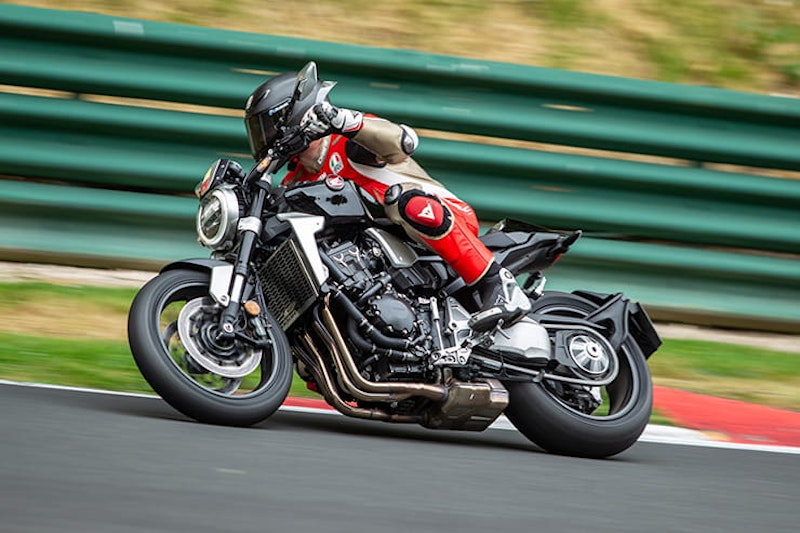
Back in March 2018 I got to ride Honda’s new CB1000R+ model at the press launch in Spain. And boy was I bowled over. Both on the spec sheet and at first glimpse you might even be tempted to swipe left (or right, I’m not sure how those dating apps work, but the direction in which you heartlessly and effectively reject a person on looks alone or in this case power figures and facial features). However, as I explained in the full review, the latest sporty naked from Japan is a cracker to ride; alert and absorbing, friendly yet flighty. As eager as a Labrador chasing a ball but it prowls like a wolf homing in on its supper, 150-odd miles on the new Honda was an extremely rewarding experience and I never felt it needed wrestling to keep it under control.
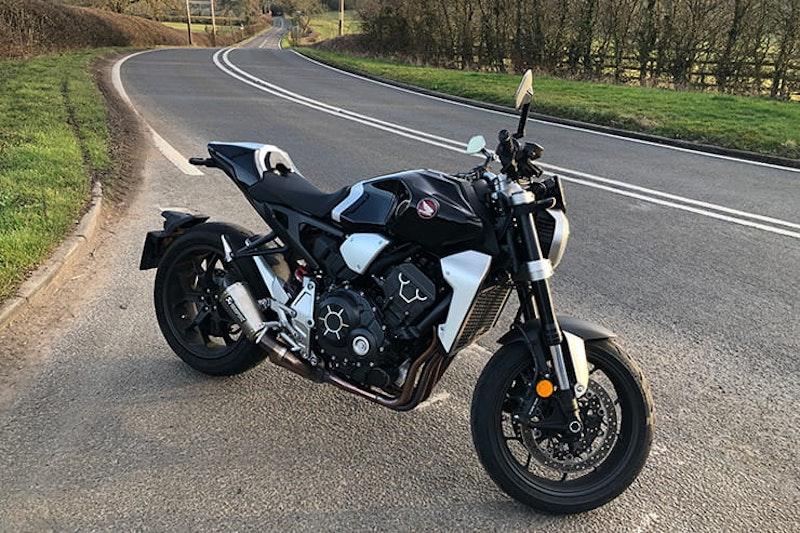
Fast forward to the summer and I took delivery of the long-term loan version. Identical to the press launch bike except for one thing; tyres. We’d been running Bridgestone S21’s in Spain – a fabulous product which worked particularly well on the smooth roads and Ascari track alike, but the bike arrived on Dunlop SportMax in the UK. Upon questioning, a Honda spokesperson confirmed that both Bridgestone and Dunlop “are the official supplied tyres from the factory” and “a customer may be able to advise a preference”. The Dunlop’s of course are perfectly fine for all purpose riding, and they’re competent in the wet too. This is a bike where inadequate rubber will be found out given its agility and powerful acceleration qualities.
So, several months later and I hear you ask, ‘was it just a holiday fling?’


Toys
Even before we took delivery our chums at Performance Parts had been in touch volunteering to replace the rather large yet one of the more stylish Euro-4 end cans. The original part makes a cracking din but once equipped with an Akrapovic Titanium Slip-On Silencer the commotion from those four cylinders is even better. It of course saves a few grams and looks more-than-just-a-little slicker too.
Keep the CB1000R+ high in the rev range for plenty of reward with peak power at a lofty 10,500rpm and if, like me, you have the Akrapovic end can fitted, the neighbours won’t actually mind because it’s more of a refined racket as opposed to a raucous gravelly din.
Handily, in our upgrade package also came a set of Rizoma mirrors which look pretty futuristic and while they do a top job at their sole requirement of offering a rearward view, their adjustability isn’t so easy. Three-way adjustability is all very well but the requirement of an Allen key to make said adjustments isn’t so convenient. The argument for the mirrors is that, once set, why would you need to move them around.
Also from Rizoma come a set of bar-ends which, in their aluminium finish are a stylish addition and offer protection to the handlebars in case of a spill. While I mention style, we also swapped the standard-fit brake and clutch levers for a set of ASV’s which are miraculous – they have a pivot design meaning they spring back in the event of a crash and therefore they come with a 5-year crash damage warranty. They also have a 180-increment adjustment range through 4 inches. They look sleek and have zero play. Everything you’d need in a set of levers and the quality of finish matches that of the Honda.


Tyres and Track
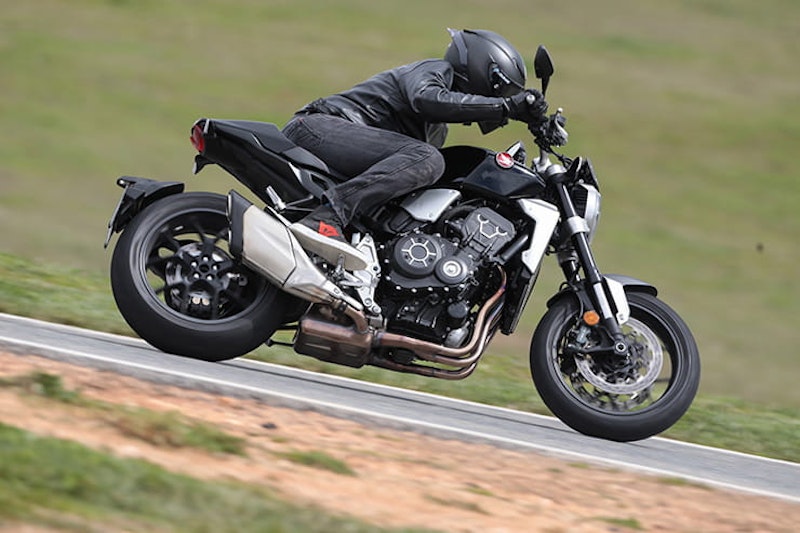
Having been invited to a Michelin-run track day at Cadwell Park I thought it only fair to switch to the Bibendum-marked rubber and because I’d had good memories of the Power RS launched in 2017 I opted for those instead of the Power Cup Evo. Fresh with a set of new boots (and a brand new set of Dainese #CustomWorks leathers) out I went in the fast group on my naked street machine surrounded by track day-ready BSB-wannabes freshly shorn of their tyre blankets. I’ll trundle around at the back taking it steady while the tyres bed in, I thought. Realistically, after about two laps they were up to temperature and feeling good. The Honda has a lively front end for track use and not masses of ground clearance but then every single person reading this will be shouting, “it’s not designed for track use”. And you’re right. But it did give me the chance to see how the performance matched up and to really stretch its legs.
As the peak rev figure will testify, the CB1000R begs for revs. The short, snappy first three gears offer plenty of acceleration performance out of the slower corners, matching its claims as a Fireblade beater to 60mph but the top speed is limited which is an obvious thing to write given the purpose is not to match the invisible track day trophy hunters.
All the tyre and lean angle were available in only the first session such was the ability of both bike and tyre. The limiting factor was the hero blobs. Even with the seat height of 830mm making it high enough for a comfortable yet sporty riding position for a six-footer like me, and the ground clearance of the footpegs which are plenty of real world road-riding ground clearance, however, on the track I didn’t necessarily mind dragging then around Chris Curve at the top of the circuit but I feared them digging in and sending me skywards when against some of the larger, old-fashioned kerbs. What must have been either annoying for any riders slow enough to be following or a really handy safety device was every time I squeezed the brake lever with any real track-style force, the hazard warning lights came on. On track, the rear shock doesn’t stand up to much and once I could feel the extra lollop, I couldn’t get away from it on the road too – even BikeSocial’s Publisher, Steve Rose, whipped out the underseat spanner set and increased the preload for a motorway munch from Peterborough to Leeds and back. There’s a fair chance that under normal riding conditions and circumstances the standard shock setting is amicable enough.
Back to the tyres and the recommended track pressures for the Michelin’s was 31/27 (cold) while on the road the manufacturers recommendation is 36/38. All well and good but after finding the limits of the bike before it got dangerous, I headed for home but forgot to put any more air in the tyres making the Lincolnshire A-roads somewhat squirmier then before.


To Work and Tomfoolery
As a commuter for my 10-miles to-and-from BikeSocial HQ, there’s barely a better machine I’ve ever used. Sure, I could count anything with a top box or panniers as more convenient. Even something with a heated seat or a screen as more comfortable. Anything more economical would be handier on the wallet but as an all-rounder that makes every journey interesting and keeps me grinning then I’d opt for the Honda. It’s comfortable, has heated grips, quick shifter and autoblipper, awesome brakes and is narrow and nimble enough to dart through any slower traffic.
Meanwhile, at Bruntingthorpe aerodrome in September, I used the CB1000R+ as a guide bike while introducing nine readers to the wonders of the Yamaha NIKEN. Pairs of riders would have a taste of the three-wheeler for two laps of the airfield while I led. It also gave me a chance to chase wonder-wordsmith and regular BikeSocial contributing road tester/feature writer, Simon Hargreaves, while he gave the Yamaha a proper work-out away from the roads. As I aimed to copy his lean angles, something which the NIKEN is rather adept at, I felt so comfortable on the abrasive, rutted surface of Bruntingthorpe and never out of control. Oh, that and an opportunity to see how easily it would wheelie once the TC was switched off!
The Honda is a wolf in sheep’s clothing. Demure and graceful on appearance yet lively and exciting once you get the clutch out in first. I bloody love it.

Part 4 - Long Term Review Verdict
Updated 18th March 2019 - Steve Rose
Honda’s 2018 CB1000R is a great example of so much of what’s wrong with UK motorcycling. It’s nothing to do with the bike, but more so the machismo and embarrassment of a customer base obsessed with irrelevant numbers. Talk to any rider who hasn’t ridden one and they’ll tell you how the CB1000R isn’t worth the premium price because it ‘only’ makes half a million horsepower. You’re better off buying the ‘insert one million bhp rival here’ because it’s faster, obviously. And so it goes on. The manufacturers, short of ideas to combat this simply give us bikes making every more power at ever-higher rpms that require ever-more-clever electronics to restrict them back to the amount of horsepower our abilities, road surfaces and brains can actually handle. Forgive me, I’ve said this before, but if we all bought jumpers in the same way we bought motorbikes, we’d spend Xmas with the family trussed up in six-armed monstrosities (‘I like to have the extra four just to get me out of trouble’) with two thirds of them safety-pinned to the sides to stop us getting them caught in the door.
Those of us who’ve ridden a 2018 Honda CB1000R have a different view. It’s so beautiful to ride that you wonder how we all managed to ignore the (very much cheaper) previous version so comprehensively. An almost perfect representation of everything Honda stands for, the CB is easy to use, capable of being brutally fast, understated, built like only Honda can and it grows on you the more you ride it. Oh, and after too many summers on lumpy fashionable V-twin supernakeds, it’s a joy to feel the seamless torque of a great four-cylinder motor again. Those half-million horsepowers are delivered easily, smoothly but with purpose when you mean it. There’s minimal electronic interference and apart from some weird disco lighting built into the dashboard, nothing to distract you from the simple pleasure of pointing it where you want to go and getting there pretty bloody quickly.


The CB1000R feels small for a 1000cc roadster. Compact and easy to manage with very soft suspension as standard. Too soft for my 13 stone bag of bones, but it took less than a morning to set it up and those settings were good enough for Michael to destroy a set of Michelin’s finest tyre edges on a track day without also destroying the CB’s extra-long hero-blobs on the footrests.
There are niggles. The price for one thing. This £12,599 CB1000R+ is an expensive bike next to Yamaha’s MT-09SP, which feels quicker and sharper to ride, has almost enough cylinders, looks nearly as cool and costs £3500 less. The Honda’s disco lights are funny for half an hour, but the dash is also lacking a little pizazz for the price. Hard to read in bright sunlight or when wet and less intuitive to scroll through the functions than a Honda ought to be.


And then there’s the chain adjustment. It sounds trivial, but this is what would probably stop me buying one. Honda’s pro-Arm system has been setting the standard for simple, functional chain adjustment for the last thirty years. Loosen the pinch bolts, twist a single cam, tighten bolts – it normally takes a couple of minutes for perfect tension and guaranteed wheel alignment.
The CB1000R’s numberplate hanger spoils all of this because it bizarrely removes access to the pinch bolts. Which encourages us ageing bodgers to resort to the kind of ingenuity and mechanical creativity we haven’t used since that time in 1986 when we tried to hacksaw through a drive chain link instead of grinding off the link-pin.
It took me 25 minutes to adjust the CB’s chain and then, without a paddock stand I couldn’t lube it properly because there’s minimal access for the lube-tin’s nozzle. Rumour has it that once you’ve adjusted the CB’s chain successfully, you get a certificate allowing you to skip the first session of gynaecology school though, which is a bonus.
If you buy your bikes to ride every day and do plenty of urban miles the CB1000R makes a great buy because the amount you’ll use and enjoy it plus the build quality and general ‘Honda-ness’ make up for the price. If you buy your bikes because they make you king of the bike meet, you’ll be needing something else.

Alas, the time has come to say cheerio to one of my favourite ever bikes as she makes her return to Honda UK HQ. A marvellous seven months of excitable and bouncy good times. Was the novelty of its Labrador puppy-esque enthusiasm going to wear off? Maybe it would over time but I can categorically, hand-on-heart, swear on the bible (other religions are available) tell you that EVERY time I fired up the Honda I couldn’t wait to ride. Even on the 145-mile round trip to Coventry in minus 4-degrees. The CB’s standard fit heated grips worked overtime that day and even the Michelin Power RS tyres, which are not ideal for greasy, horrible conditions, were ok. Overall, it’s not missed a beat or had anything fall off over the 1800-miles covered since last July.
It’s a real rider’s bike. Treat it mean and it’ll keep you keen, on edge and wondering if you dare use every percent of the throttle movement available in the first three gears such is its ferocious amount of torque. I know, you wouldn’t think by just looking at it that the Honda can have your pants pulled down in a flash. Thanks to the revisions to torque and power delivery at the lower-to-mid rev range, it’s quicker than a Fireblade to 100mph, so they say. And I can quite believe it. Whereas a simple potter into or around town would have you believe it’s as mild-mannered as a Hamlet-smoking, slipper-wearing, whiskey-supping, Werther’s Original-sucking, snooker-watching grandfather lazing in his favourite wing-back chair on a Sunday afternoon.
The instant torque, throttle pick-up and lively quartet of singing cylinders, when coupled with the bike’s short wheelbase and excellent chassis give plenty of feedback making the rider feel so engaged with the machine. And it behaves on the edge of out-and-out hooliganism, where you’d expect to meet such madness and expense as a Tuono V4 1100, 1290 Super Duke or MT-10, making it a little more controllable and a little more manageable. Oh, and the noise from the Akrapovic slip-on is worth every penny if you fancy an upgrade. The rumble is crossed with a dull bark and it’s A1-mega in my world.
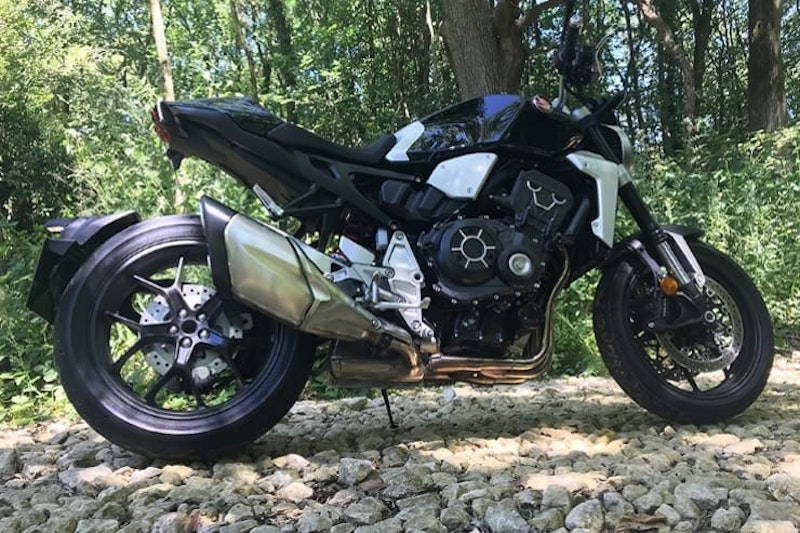
A couple of down sides to report though. While the non ‘+’ model is available in red or black, the 2018 + model we had was only available in black… and it shows the dirt instantly. For 2019, Honda added a Silver colour option to each in the range.
The aftermarket Rizoma mirrors are a hell of a lot better looking that the old-fashioned standard versions and while they are very effective when in position, they are a pain to adjust.
I’d be happy as a pig in muck if I had one of these in my garage. They’re versatile enough for a commute, Sunday blast, b-road hustle and track day. Don’t judge a book by its cover because the CB1000R+ is a wolf in sheep’s clothing.
Likes and Dislikes
Creamy smooth four-cylinder power
Strong brakes with precision feel too
Versatile suspension performance
Superb quickshifter
Long distance comfort (pegs are too high for me)
Mirrors could be better
Pricey next to the competition
Rear shock is lacking when compared to the competition
Modifications and Accessories
Akrapovic Titanium Silencer Slip-on Kit: £657 | www.performanceparts-ltd.com
Rizoma Bar Ends: £42 (pair) | www.performanceparts-ltd.com
Rizoma Veloce Naked Mirror: £127 (each) | www.performanceparts-ltd.com
ASV C5 Brake Lever: £110 | www.performanceparts-ltd.com
ASV C5 Clutch Lever: £110 | www.performanceparts-ltd.com
Michelin Power RS: £90 (front), £124 (rear) | moto.michelin.com
2018 Honda CB1000+ - Technical Specification
| Engine | 998cc, liquid-cooled DOHC, in-line 4 cylinder |
| Bore x stroke | 75 x 56.5 mm |
| Compression ratio | 11.6:1 |
| Power | 143.5 bhp (107kW) @ 10,500rpm |
| Torque | 76.7 lb-ft (104Nm) @ 8,250rpm |
| Carburation | PGM-FI |
| Transmission | 6-speed |
| Clutch | Wet, multiplate clutch |
| Frame | Steel mono backbone |
| Front suspension | Showa SFF-BP USD fork, adjustable for pre-load, compression and rebound |
| Tyre sizes | F; 120/70 ZR17, R; 190/55/ZR17 |
| Rear suspension | Monoshock, adjustable for preload and rebound |
| Front brake | 310mm double disc, 4-piston radial calipers, ABS |
| Rear brake | 256mm single disc, twin piston caliper, ABS |
| Wheelbase | 1455mm |
| Caster Angle | 25° |
| Trail | 100mm |
| Fuel tank capacity | 16.2 litres |
| MPG | 46mpg |
| Wet weight | 212kg |
| Seat height | 830mm |
| Dimensions (HxWxL) | 1090mm x 789mm x 2120mm |


