Basic home motorcycle maintenance and servicing | Oil, filters & spark plugs


By John Milbank
Consumer Editor of Bennetts BikeSocial
25.02.2020


Your motorcycle – or any vehicle for that matter – needs regular maintenance to keep it handling and performing at its best; it’s also vital to ensuring it’s safe. Anybody with a bike out of warranty could save themselves a lot of money by doing some – or even all – of the work while also gaining the satisfaction of getting even closer to their bike…
How do I look after my motorcycle?
Motorcycles need regular maintenance. Day-to-day that means checking tyre pressures and keeping the chain (if it has one) lubricated. It also includes keeping the bike clean – not only to keep rust at bay, but to help you check that everything is in good condition; watching for any signs of failing bearings, damaged seals and other wear-and-tear is very important.
The first step is to thoroughly understand your bike’s owner’s manual – that will outline the basics of what you should do to look after your bike.
If you’re going to go a step further and do some of the servicing, buy a Haynes manual; it really will make life a lot easier, and can save you a fortune. Bennetts Rewards customers can also save 40% on all Haynes manuals – and 10% at Halfords – so be sure to check out these and many other offers.
There’s far more to servicing and maintaining a bike than just changing the oil, filters and spark plugs – your bike’s owner’s manual and the Haynes manual will explain what else needs doing, and you can follow our guides on everything from wheel bearings to valve clearances by clicking here.
Expert tip: Some manufacturers are more flexible with where you get youyr bike service
Until an EU ruling expired in the UK in 2022, you didn't have to use a main dealer to keep your bike's warranty, as long as genuine parts and lubricants were used at the specified times, and that you kept all receipts. That's still sometimes the case, but it will depend on the brand. Check out this guide to wether you need to have your motorcycle serviced by a main dealer to see what they all say...
How long should my oil, filters and spark plugs last?
The engine oil in your motorcycle should be changed at least every year, regardless of how often you ride. You can read more about motorcycle oil here, including the differences between mineral, semi and fully-synthetic, cold-starting and which weight of oil you should use.
Your air filter will clog more quickly if you’re riding in dusty environments, and in some cases – like my 1999 Kawasaki ZX-6R – it can be cleaned and re-oiled, though a pattern replacement isn’t expensive.


Plugs from a neglected bike… you don’t need telling which are the new ones!
How do I know when my bike needs servicing?
If you’ve got an oil warning light showing, or your bike’s started running rough, you’ve left it way too late; for both safety and performance, your bike must be serviced at the recommended intervals.
And remember that oil, filters and plugs are just part of important maintenance – you need to be checking the condition of the brakes, tyres, bearings, cables, electrics etc…

You’ll find OE and pattern parts for almost any bike at Wemoto
What parts do I need?
You can buy all the parts you need from your main dealer, but most of the items can be bought as pattern parts, as long as you get them from a reputable dealer of quality kit, like Wemoto. Check what you need in your owner’s manual / Haynes manual, but for this bike it’s the following:
3.6 litres 10W40 oil - I'm using Motorex, as having visited the factory. I was able to see the research and development that went into it.
Oil filter – £9.41 for Kawasaki OE or £5.28 for HiFlo from Wemoto
Sump washer (M12 x 16mm x 1.5mm for this bike) – 32p from Wemoto
Air filter – £23.05 from Kawasaki or £13.80 for HiFlo from Wemoto
Spark plugs – 4x £7.48 from Wemoto
It’s VERY important that you only ever use the specified spark plugs for your motorcycle; they will be designed to operate at a certain temperature, but they also vary in length; even a few millimetres too long could be catastrophic for your motor.


What tools do I need?
This article isn’t intended to be all you need to service any motorcycle. I’m basing it on my 1999 Kawasaki ZX-6R, but your bike will have its own unique needs, so I thoroughly recommend buying a Haynes workshop manual first. My hope is that this will give you the confidence to take on the job for yourself, but only with a workshop guide specific to your machine will you have the correct procedure. Remember that Bennetts customers can save a massive 40% on Haynes manuals at Bennetts Rewards. You’ll also need the following…
Socket set
Oil filter wrench – you can use a chain-type, but it’s worth investing in a cup wrench, which fits over the filter and makes it easier to remove and torque up correctly – they’re only £5.47 from Wemoto
Spark plug socket – there should be one in your bike tool kit, but if not, it’s a huge help to get one that has a rubber insert to grip the plug
Torque wrench. This isn’t essential, but it’s thoroughly recommended
Screwdrivers
Allen keys
Protective gloves
Oxford Clean Grips are great for keeping your bar grips from getting oiley

Oxford clean grips have proven really handy over the years
How do I change the oil and oil filter on my motorcycle?
Regularly changing the oil is the most important thing you can do in order to keep your bike’s engine healthy. Fortunately, it’s also one of the easiest jobs to do…
Step 1: Warm up the engine
Before dropping the old oil out, run the engine for a few minutes so that the oil will flow out more easily, taking more deposits with it. Needless to say, the engine and exhaust will get hot, so take care.

Having an Abba Sky Lift makes working on a bike so much easier
Step 2: Stand the bike upright and open the oil filler cap
The motorcycle needs to be upright and level, so if it doesn’t have a centre-stand, you’ll need a paddock stand. I’ve got my bike on an Abba Sky Lift, which has been hugely helpful during all the work I’ve done on this motorcycle.
Unscrew the oil filler cap, to allow the air to get into the motor and reduce the glugging of the oil when it comes out.
Quick tip: Buy a decent oil catch tray
For years, I had a large oil-container that doubled as a catch-tray; a cap in the top could be opened to allow the oil to flow straight inside, then it could be taken to the tip for safe disposal. Very convenient.
Until you knock the cap while walking past it in the garage one night without realising. In the five minutes I was away, the garage was flooded with used engine oil. It took two hours to clean up, and some nervous riding the next day after it had pooled around my bike’s tyres.

Be careful how you store old engine oil…
I’ve since bought one of these oil drain pans, which sits easily under the bike (or my wife’s car), and is much larger, meaning less oil gets spilled on the drive when draining the car in the wind. The spout on the end makes it pretty easy to get the oil into the empty bottle, and any oil left in the bottom of this doesn’t spill out if you lean it up against the wall.
Step 3: Clean up
Clean any dirt away from the sump plug and the area around it, as well as around the oil filter where it meets the engine.

Step 4: Open the drain plug
With your oil catch tray underneath, carefully open the sump bolt – use a spanner or socket set to crack it loose, then open it by hand (with your latex or similar gloves on). By carefully undoing it while keeping it pushed in, you’ll feel when the threads run out; then whip the bolt away and the oil should drain straight down, without you dropping the bolt into the puddle of oil. Check that the sealing washer is on the bolt – if it’s stuck to the bottom of the sump, pick it off and discard it.
Leave the oil to drain until no more is running out.
Expert tip: use a Haynes Manual
“Even for simple jobs like this, you should use a Haynes manual,” says Nick Nomikos, owner and MoT tester at The Two Wheel Centre in Harpenden. “Some bikes have unique designs, like the BMW K1600LT for instance, which has a sump bolt hidden inside the engine, under the main sump bolt.”
Step 5: Fit the sump bolt
You could check the sump washer for damage and reuse it, but for the pennies they cost, I always replace them. Make sure you’ve discarded the old washer, pop the new one on, then – after wiping the sump opening of oil – pop the bolt in. If you have a torque wrench tighten it to the specifications. It’s just 20Nm here, so if you don’t have a torque wrench, be careful not to over-tighten it.

Quick tip: Consider a magnetic sump bolt
Wemoto offers a magnetic sump bolt for this bike – it will hold onto any metal that might chip off some engine parts. If you do find anything, there could be a serious issue that needs investigating, but at least the magnet could have stopped the chip causing further damage.
They’re available for other bikes, but make sure you get one specific to your machine. This one costs just £6.06, and comes with a new washer.


Step 6: Remove the oil filter
Move your catch tray so that it’s under the oil filter.
Using filter removal tool, crack the filter off; oil should run from the gap between the filter and the engine block, then you can unscrew it. As you’ve already drained the engine, there shouldn’t be a gush of oil, but do remember that there will be oil left in the filter itself.

Step 7: Oil the new filter
Using your new engine oil, get some on your finger and wipe it around the large rubber O-ring in the filter.

Step 8: Fit the new oil filter
Wipe the filter seat clean, then spin the filter on. If you have a torque wrench and a cup wrench, tighten it to the specified torque (10Nm on this bike). If you don’t have the tools, spin it on until the rubber seal touches, then tighten it by hand about another ¾ of a turn.

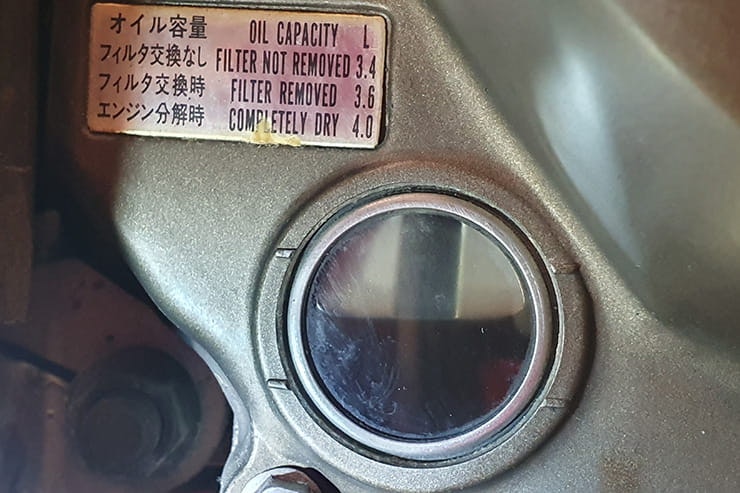
Step 9: Fill up with oil
Using the specified amount of oil (3.6 litres on this 1999 Kawasaki ZX-6R), carefully pour it into the filler. Once you’re done, the oil should sit between the two lines on the inspection window (if your bike has one). The correct level is important – never under or over-fill an engine.
Now run the bike for two or three minutes, keeping an eye out for leaks. Stop it, wait several minutes for the engine to cool, check again for leaks around the sump plug and filter, then check the oil level, topping it up if you need to.

How do I change the air filter on my motorcycle?
Most bikes have their air filters located underneath the fuel tank, which usually needs removing. On some it might be under the seat, on others – like the BMW S1000XR – it’s accessible via a panel behind the ignition switch. You’ll need a Haynes manual if you’re not sure, but on this 1999 ZX-6R, it’s under the tank…
Step 1: Remove the tank
On this bike, that means turning off the fuel tap, removing the plastic handle from the tap, unscrewing the bolts at the front of the tank and the back (under the seat), then lifting it off, while carefully detaching the fuel hose.

Step 2: Remove the air-box cover
This bike has a hose attached to the air-box lid, which can be pulled off. Then just remove all the bolts and lift the cover off.

Step 3: Swap the old filter with the new one
The standard filter on this bike is designed to be cleaned and re-oiled, but if it’s in any way worn or damaged, replace it. No dust or grit can be allowed to enter your engine.
When I opened this airbox, I found an expensive K&N air filter, which is also designed to be cleaned and oiled. They allow more air to flow into the engine, and are often used in combination with a new exhaust (my bike came with an open pipe that I replaced with an original).
The problem with letting more air through is that the fuel mixture will be lean, which can seriously damage your engine. I was told by the seller that the carbs hadn’t been re-jetted, so I took out the K&N and fitted a standard Hi-Flo from Wemoto (fortunately the spark plugs didn’t show signs of lean running)
Make sure you fit the filter the correct way round – here it’s with the dark foam to the top.
Once the new filter’s in, just refit the lid and the tank, then you’re done. Unless you’re also changing the spark plugs…
How do I change the spark plugs on my motorcycle?
The expected lifetime of spark plugs varies by bike, but they can also be a good guide to how your engine is running. How you get to the plugs will vary; on my Honda Grom it’s a piece of cake, but on others it can be a long job, which is why it can cost so much for a dealer to do it for you….
Step 1: Remove the tank and the airbox
With the airbox lid off as described above, on this bike you also need to take off the bottom of the airbox by removing two more bolts, and the hoses that link to the base.
It’s worth laying a cloth over the intakes, just to make sure you won’t drop anything in there. If it helps, you can also remove the vacuum assembly on this bike.

I used my Brühl bike dryer to blow the grit away – make sure the intakes are covered first!
Step 2: Clean the area around the plugs
As the plugs sit in wells inside the head, you don’t want to knock any grit or small stones in there as it’ll fall into the engine when you remove the plugs. Thoroughly clean the area all around, also using an airline if you have one (I used my Brühl bike dryer) to blow loose grit well away.

Step 3: Remove the spark plugs
Take note of the layout of the plug leads – if they’re not labelled, you might want to put a bit of tape on them, to make sure they go back on correctly.
Pull the plug caps off, then press your plug socket down onto the spark plug and pop a socket or spanner on the top to undo it then remove the plug. Hopefully the plug is gripped inside the socket by the rubber bung, but otherwise use a magnet to lift it up out.

My plugs look a little black on the tip, perhaps indicating rich running, but as the bike hasn’t been maintained well for the past decade, I’ll only get a true idea when I check the new ones
Step 4: Check the condition of the spark plugs
As you remove each plug, have a close look at the end – you can tell a lot about an engine from it. I panicked when I removed a couple of the plugs from my ZX-6R as they had oil on them, but looking carefully it was on all of the thread of the plug. Oil in cylinders caused by leaking valve stem oil seals or piston rings would leave oil on the end of the plug but not all of the thread, which is of course screwed into the cylinder head. The gaskets on the valve cover (easily replaced) were simply leaking oil down the plug well into the bottom, so as the spark plug was removed, the oil coated the thread.


Every Haynes manual has a really useful guide in the back that shows you what the condition of your spark plugs means. Thanks to Haynes, we’ve reproduced the images from its online manuals, via haynesmanualsallaccess.com…

Step 5: Check the electrode gap
Plugs can be cleaned, as long as you do it carefully with a wire brush, and you also check for any damage. Personally, I just replace them.
You should check the electrode gap using a feeler gauge, but in the last ten years at least, I’ve never found one that needed adjusting from new. If it does, the side electrode can be carefully bent to suit. Don’t lever against the electrode tip, especially with very fine iridium plugs.

Thread the new plugs in by hand until they reach the bottom
Step 6: Fit the spark plugs
Having a tool that grips the plug while you insert is a massive help here, otherwise you’ll have to use a piece of soft plastic tube that grips the end of the plug and can be pulled off after it’s screwed in, or shove some Blu-Tack into a socket (though make sure none gets left on the plug).
However you do it, it’s vital that you don’t cross-thread the plugs; you’re screwing a steel thread into an aluminium cylinder head, so be careful! I find the hole, then turn the plug anti-clockwise (undoing it… righty tighty, lefty loosey). Do this gently and you’ll feel the threads drops over each other as it turns – at the point immediately the threads drop over, you can start turning the plug in by hand – it should have picked up correctly.
Screw the plug all the way in by hand – if there’s any resistance, take it out and try again.

Once the plugs are finger-tight, it really is best to use a torque wrench; on this 1999 ZX-6R they should be tightened to just 13Nm. As you nip them up, you’ll feel the crush washer on the plug compress… this can feel like a thread stripping, but as long as you screwed the plug all the way in by hand, you can try to reassure yourself.
If you’ve never changed spark plugs and you don’t have a torque wrench, I’d strongly recommend you borrow or buy one; you must be careful.
Once the plugs are in, refit all the plug caps in the correct order, then reassemble the airbox and bolt the tank back on.
If you can’t do this job yourself, your dealer will be happy to take the work on. While prices will vary, Nick Nomikos, owner and MoT tester at The Two Wheel Centre in Harpenden (as well as our technical advisor) says he’d charge £23 for an oil and filter change, or £150 for oil, oil filter, air filter and spark plugs on a 1999 Kawasaki ZX-6R like this. All prices include VAT, but exclude parts.

A Helicoil can rescue a stripped plug thread in the head
Can you repair a stripped spark plug thread in the cylinder head?
If the thread in your aluminium cylinder head is stripped or damaged, it can usually be fixed. You shouldn’t try to use Chemical Metal or JB Weld, but a Helicoil can give an effective repair when fitted correctly.
Helicoils are a coiled wire insert that threads into the head with a special tool. There’s a tang on the bottom of the Helicoil that’s used to fit the coil, then it’s snapped off when installation is complete.
I’d recommend this is installed by a professional only, as if it goes wrong, it’s time for a new cylinder head.
It’s possible that the Helicoil can be fitted without removing the head, as aluminium heads can be Helicoiled without drilling; when the damaged thread is re-tapped, if heavy grease is applied to the tap, it should hold onto the swarf. The tang mustn’t drop into the motor either of course!
Ultimately, take real care when fitting spark plugs and buy a torque wrench.
When I started riding back in 1996, I didn’t have the confidence to service my CBR600, so I took it to a local workshop (now long closed). One of the mechanics there changed my spark plugs, but when I rode it away it sounded like the engine was ‘blowing’ a little. They didn’t seem concerned, but a few days later the spark plug blew out of the head. Naïvely, I took the bike back to the same workshop, where they charged me to fit a helicoil.
A year later – after I crashed the bike – as rebuilt it I took the plugs out and the helicoil came out with the plug. I had it properly repaired by a more trustworthy shop then, and it never caused me any more problems. I’ve always done my own servicing since.
Know your limitations when working on any vehicle, and if you aren’t comfortable doing the work yourself, take it to a mechanic that has a good reputation and that you’re sure you can trust.