How to replace fork seals, oil and bushes | DIY Motorcycle maintenance


By John Milbank
Consumer Editor of Bennetts BikeSocial
17.02.2020


Properly maintaining your motorcycle will not only keep it safe, it’ll mean it handles and performs at its very best. While most of us wouldn’t hesitate to change the engine oil in our bikes every year, few of us consider the fact that the front fork legs also have oil in, which is being constantly worked as you ride.
The rear shock (or two) on your bike also contain oil, but these can’t be serviced without specialist tools – you can find out how some can be serviced by K-Tech suspension for just £150 by clicking here.
Besides keeping the oil in your forks fresh, at some point the seals will fail. Here’s how you can fix them for yourself…


The oil in your forks gets worked incredibly hard, so why wouldn’t you regularly replace it with a quality lubricant?
How do I look after my motorcycle forks?
Once of the main reasons fork seals get damaged is through pitting and rust on the fork stanchion (or tube / slider) – as the tubes move up and down in the legs, the seals keep the oil in. But any imperfections to the chrome can tear the seal, allowing the oil to leak out. Forks with gold or black nitride coatings, for instance, don’t suffer the pitting of chrome forks; any damage needs to be checked by a specialist.
Small imperfections in the chrome can be carefully removed with very fine emery paper and some WD-40, but if the damage is too bad they’ll have to be re-chromed or replaced. If re-chroming, it’s important to use a specialist fork repair company, who’ll understand how critical the tolerances are.
Basically, like the rest of your bike, keep the forks clean. Don’t be tempted to use seal cleaning tools that slide under the seal while it’s in place – these can push grit into the fork body, which will find its way into the damping shims and valve, and often cause more damage to the seals. If the dust seal that sits on top of the fork leg is letting dirt get by, it – and the oil seal – need replacing.

Pitting to the forks stanchions will quickly tear the seals
How long should my fork oil, the seals and bushes last?
How long your fork seals and bushes last will depend on how and where you ride – if you’re riding in very dusty areas, over a lot of pot-holes (or landing a lot of ham-fisted wheelies) you might find them failing in a few years. Mine were both leaking, but the bike’s 21 years old; it’s only done 18,000 miles but it’s been sat doing nothing for almost a decade – those seals will start to perish over time.
Oh, and it used to be owned by the ex-editor of Fast Bikes magazine, though he promises me he didn’t ride this like he did press bikes. It was his mum’s bike before that – maybe she was a bit of a hooligan.
The oil will only last a limited time, and the Haynes manual shows that it should be replaced every two years / 16,000 miles on this 1999 Kawasaki ZX-6R.
The very best way to keep your forks at their best is to service them. While every two years would be ideal, assuming they have no problems, every three to four years (unless you’re on track or riding an awful lot) should be fine. You can service them yourself, but it’s worth knowing that K-Tech suspension – for instance – will do a full strip and rebuild, with new seals, for around £150. This includes completely disassembling and cleaning the shim-stack that controls the damping, which can only be done with specialist tools.

Oil on the stanchions is a sure sign of a blown fork seal
How do I know when my fork seals and bushes need replacing?
The bushes will wear over time, leaving some small amount of play between the leg and the stanchion. Realistically though, you’ll see the fork seals fail first, and if you’re replacing those, you might as well replace the bushes too, especially as they have to come out to get the seal out.
The seals are more obvious when they fail – you’ll see traces of oil on the fork stanchions near the dust seal; if there is any, wipe it clean then bounce the forks a few times to check it wasn’t just road filth.

What parts do I need?
Always replace your seals and bushes as a pair – if one leg is showing problems, the other won’t be far behind. A pair of fork dust seals (the seals you can see) for this 1999 ZX-6R are £20.62 from Kawasaki, while a pair of the oil seals that sit underneath them are £22.08. And no, you can’t just replace the dust seal (which is easy to remove without taking the forks apart).
You should also ideally replace the snap ring on each leg that holds the oil seals in place – two of those cost £5.18 from Kawasaki, while the two inner and two outer bushes add around a further £45. That’s a total of over £92 for OE.
Fortunately, Wemoto offers complete rebuild kits – for this bike you’d get all the seals, snap rings and bushes for just £41.29.
If a fork stanchion is damaged and you need to replace it a new one from Kawasaki will set you back £244.51. S bent fork leg can sometimes be straightened, but if it’s creased it must be replaced. Wemoto sells Italian-made Paolo Tarozzi fork stanchions for £140.28.
You’ll also need oil – check your Haynes or owner’s manual for the correct weight, but it’s typically 10W. Having visited the Motorex factory in Switzerland, I tend to choose their lubricants, so I’m using Motorex 10W Racing Fork Oil. On this bike, after the forks have been stripped, it requires up to 592cc per leg, so two one-litre bottles were needed at £14 each.


What tools do I need?
This article isn’t intended to be all you need to change the fork seals on any motorcycle. I’m basing it on my 1999 Kawasaki ZX-6R, but your bike will have its own unique needs, so I thoroughly recommend buying a Haynes workshop manual first. My hope is that this will give you the confidence to take on the job for yourself, but only with a workshop guide specific to your machine will you have the correct procedure. Remember that Bennetts customers can save a massive 40% on Haynes manuals at Bennetts Rewards. You’ll also need the following…
Allen keys
Spanners
Socket set
Flat-bladed screwdriver
A tool to drive the new oil seals and top bushes in, or a length of pipe that just fits over the outside of the fork stanchion
Fork oil level tool, or a vernier caliper, or a ruler
Forks seal and bush fitting tool, or a length of pipe that will fit over the stanchion.
An impact wrench. You might be able to manage without one, but you’ll need an assistant.
Brake cleaner

A suitably sized piece of tube can be used as an alternative to a seal / bush fitting tool
How do I change the fork seals on my motorcycle?
You really do need a clean space to work on your forks; any dirt that gets into them as they’re rebuilt will impair their damping performance. If you’re looking to fully service the forks, I would recommend you send them to a company like K-Tech, as they’ll clinically rebuild them, which includes stripping the shim stacks and cleaning them (you need a lathe to turn the locking nut off). Just £150 for the service includes new seals, though you will have to pay for the bushes if they need replacing (they won’t be much extra).
If you’re just replacing the seals and bushes, you’ll be able to get most of the suspension clean, but don’t attempt to remove the shims.
Only work on one fork leg at a time, to avoid mixing parts between the two, which will have worn slightly differently.
Step 1: Wind off the spring preload and screw down the rebound adjuster
If you want to set the preload back where it was, count how many turns you make before winding it all the way off. Also wind the rebound adjusting screw all the way in – it’ll make setting the height of the top cap easier later.


Always avoid using an adjustable spanner if you can - this was all I had to fit the fork caps when I loosened them before taking them to Nick's workshop
Step 2: Loosen the top caps
Before removing the forks from the bike, loosen the bolts on the top yoke that hold them in place, and the handlebar clip-ons (if fitted). At this stage, don’t loosen the bottom yoke bolts. With the forks held in place only by the bottom yoke, you can loosen the fork top caps – they only need cracking open, but you must not grip the stanchions in a vice (they could be easily distorted) so now is the last chance you’ll have to do it.
Step 3: Remove the forks
Before dropping the fork legs out, take note of where they sit relative to the top edge of the top yoke.
You’ll already have taken the wheel out, but you’ll also need to remove the mudguard, calipers and anything else that’s fixed to the forks. Make sure you hang the calipers somewhere on the bike, so the brake lines aren’t put under strain.

Step 4: Remove the bottom bolt
The exact method of dissembling forks is going to vary depending on the age of the bike, and whether they’re upside-down or right-way-up; having a Haynes manual is essential.
Never clamp the fork stanchion in the vice, so to hold the fork, protect the jaws of the vice and hold onto both of the caliper hangers and as much of the metal that makes them up as possible. Still take care through.
On this ZX-6R, the left fork leg has the axle nut in – remove this to get at the bolt inside the bottom of the fork leg, which holds the damper cartridge in place.
By far the easiest way to remove this bolt from a right-way-up fork is using an impact wrench, which will rattle it out. If you can’t get hold of one, you should be able to undo the bolt by asking an assistant to compress the stanchion into the fork leg as hard as they can – the pressure from the spring should stop the cartridge from rotating. Of course, there is a Kawasaki tool available to hold the cartridge.

Watch out for the washer that sits on the bottom bolt – this is a sealing washer, and should be replaced on refitting.
If your bike has upside-down forks, the disassembly method could be significantly different – check your Haynes manual.

Step 5: Drain the old oil
Haynes suggests a different order to stripping the forks down, and if you’re unsure, it’s best to follow that. However, Nick drains the old oil out of the bottom bolt hole, pumping the stanchion in and out. Leave it to sit for as long as you can to drain as much as possible.
Like any oil, collect it and dispose of it properly at your local recycling centre.

Step 6: Remove the dust seal
Using a flat-bladed screwdriver, carefully prize the dust seal off the top of the fork leg.

Step 7: Remove the snap ring
With a smaller screwdriver or a pick, remove the snap ring that sits on top of the oil seal.

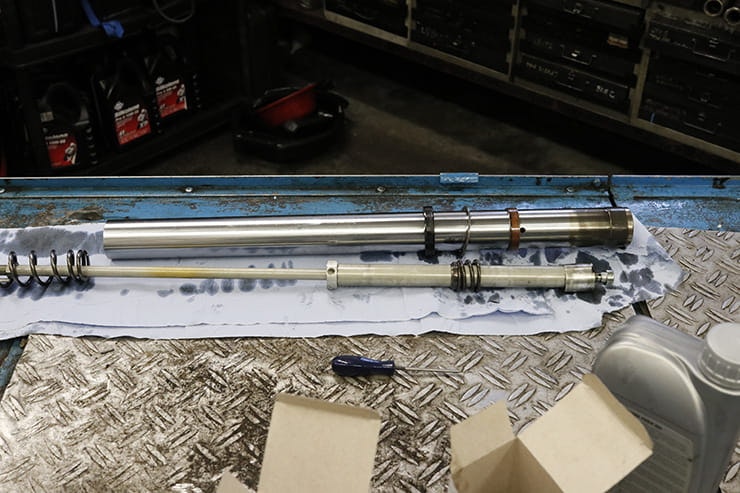
Step 8: Pull the fork stanchion out
Again, the order will vary according to the bike, but at this stage Nick has left the fork top attached to the stanchion because he’s fully-removed the bottom bolt that holds the cartridge in, otherwise, the fork top will need to be removed from the damper rod.
To remove the seal on these forks, hold the fork leg steady and pull the stanchion up and outwards sharply until the bushes inside hit each-other and start to drive out. You’ll need to do this a few times until the seal and bush pop clear and the stanchion is removed. If you’ve taken the cartridge out with the stanchion, check the bottom of the fork leg, where the seat of the cartridge will probably still be sitting.


Step 9: Remove the bushes and seals
Keeping an eye on how everything fits for later, the bottom bush needs to be prized open with a flat-bladed screwdriver in order to pop it off the bottom of the stanchion, then the top bush, followed by its washer and the oil seal can be slid off.

Step 10: Remove the cartridge from the stanchion
A full service from a company like K-Tech would see the cartridge itself disassembled and thoroughly cleaned, but that requires a lathe and some specialist knowledge.
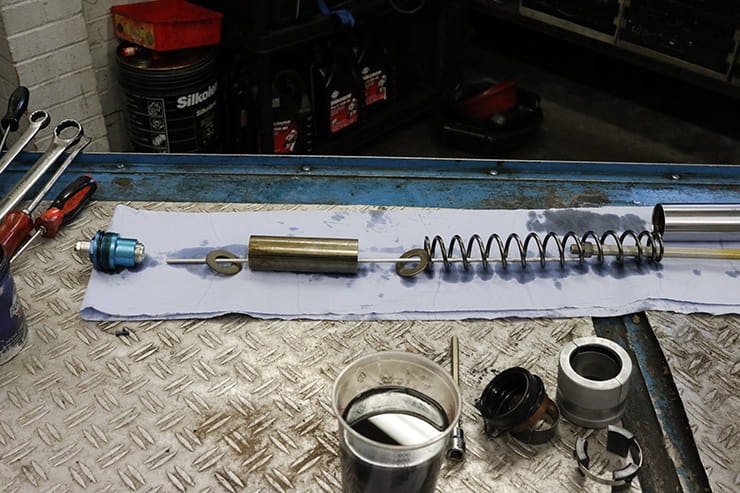
Assuming you remembered to loosen the top cap while the fork leg was still in the bike, unscrew it fully and slide the stanchion down. You can then hold the preload adjuster while loosening off the lock-nut. Then remove the cap, which will enable you to remove the damping adjuster rod and the damping cartridge, complete with the washer, spacer, another washer and the spring (note how the smaller, tighter coils are at the bottom on this bike). Watch out for the seat that goes between the bottom of the cartridge and the base of the fork leg – it’ll likely still be in the leg.
Lay all the parts out on a clean bench, ideally on a paper workshop towel.

Step 11: Fix any minor pitting
On chrome fork stanchions, run your fingernail along any marks or pits to feel for any small ridges; using 1200 grit emery paper and some WD-40, these can be carefully sanded away. Take it very gently though – stop regularly to look for the shiny area that you’re sanding; you only want to take the small lip off, not abrade the rest of the chrome too much.
Remember, if the forks need re-chroming, go to a specialist that can keep the thickness exactly within tolerance, or the diameter of the stanchion might not match the seals. Severely damaged stanchions should be replaced.
If, once the edges have been taken off, you’re left with a hole in the chrome caused by corrosion, you really should replace the stanchion or have it properly re-chromed. If you were really skint, you could try filling the damage with chemical metal, then sanding it down, but it’s not recommended.
Expert tip: Watch for pitting on the whole stanchion
“While it’s pitting on the swept area of the fork stanchions that will cause damage to the seals in use, you need to remove any rust and pitting from the area above it too,” says Nick Nomikos, owner and MoT tester at The Two Wheel Centre in Harpenden. “Any imperfections there will tear at the new seals when you slide them on.”

Step 12: Clean everything
Using a solvent cleaner like brake cleaner, thoroughly clean all the parts of the suspension, using a paper towel or rag with something to poke it down to clean right inside the leg, making sure you don’t leave anything in there. If you have a compressor, blow the parts dry.
Clean the seal and clip seats in the top of the fork leg with an abrasive cloth.

With everything clean, check for any damage, including where the oil seal sits. If you don’t have a run-out gauge, you can check the fork stanchion is straight by rolling it on something flat, like a sheet of glass. Also check the spring for any signs of damage, and that it’s not sagged – the length it should be is in the Haynes manual; in this case it shouldn’t be shorter than 264mm.

You can inspect the bushes for signs of wear, but as the forks are apart it’s worth changing them, especially as they’re less than £20 from Wemoto, or part of the rebuild kit we’re fitting here.
You should also check that the damper rod moves freely up and down inside the cartridge – if it doesn’t, it’ll need replacing.

Step 15: Fit the new bottom bush
The new bottom bush will need gently opening with a flat-bladed screwdriver before it can be popped onto the bottom of the stanchion. Then wipe some of the new fork oil on the bush and pour a little into the fork leg to lubricate the sides.

Step 14: Refit the cartridge
Slide the cartridge all the way into the stanchion, making sure the seat is on the bottom – this has to go on the correct way around so that it mates with the bottom of the cartridge. You can now refit the bottom bolt and sealing washer. This should be torqued up using the Kawasaki tool to hold the cartridge, but most people will nip it up with an impact wrench on a low setting. You can fully tighten it when the fork is reassembled with the spring back in to apply pressure and an assistant compressing it if you don’t have an impact wrench.

Step 15: Fit the top bush
Push the stanchion down into the fork leg as far as it’ll go, then wipe some fork oil on the new top bush and slide it down over the stanchion until it sits squarely above the recess in the top of the fork leg.
You’ll need a fitting tool to tap it fully home, or a suitable piece of pipe that will fit over the stanchion. At a push, you could use a flat-bladed driver to tap it home, moving around 90° with a gentle tap each time until it’s fully seated, but make sure you have the washer sat over the top of the bush before doing so.
Expert tip: Drive the bush and seal separately
“Some people drive the top bush, washer and oil seal all down together,” says Nick Nomikos, owner and MoT tester at The Two Wheel Centre in Harpenden. “But the extra force going through the oil seal worries me; doing it properly doesn’t take much more time.”

Step 16: Fit the new oil seal
After double-checking the washer is in place above the bush, wipe some fork oil on the lip of the new oil seal, then check which way up it is; the markings should be on the top face. Slide the new seal over the stanchion and down into the top of the fork leg. Using the section of pipe again, or a seal-driving tool, push the seal home until it’s properly seated and the groove is clearly visible for the retaining snap clip to go into.


Step 17: Fit the retaining clip and new dust seal
Pop the snap clip into the groove above the oil seal (use the new one that came with the Wemoto kit if you bought that), then check it’s properly seated by rotating it. You can now run a little fork oil around the inside of the new dust seal and slide it into place. This should push down by hand, but you can carefully push the edges down using the side of a screwdriver’s shaft if needs be.
Step 18: Prime the cartridge
There is a special tool available to pump the damper rod, but you should be able to reach the rod to do it by hand. Fully compress the stanchion and the damper rod, then slowly pour in the specified amount of oil – it’ll be at the front of the ‘Frame, suspension and final drive’ chapter in your Haynes manual; on this bike 500cc will be more than enough for now.
Reach in and take the damper rod to pump it fully up and down ten times. Then pump the stanchion up and down ten times.

Step 19: Set the air gap
The quantity of oil you put in isn’t as important as the distance it is from the top of the stanchion. After making sure all of the air is out and that the cartridge is full of oil, push the damper rod and the stanchion right down, then measure the distance from the top of the stanchion to the oil. You can do this with a ruler or a vernier caliper, but the easiest way is with a fork oil level tool, which is basically a graduated tube with an adjustable plate and a syringe. I made one once with a narrow pipe taped to a ruler and an old syringe.
Add or remove oil until the air gap is as specified (in the same place in the Haynes manual). Here it’s 103-107mm.
Step 21: Check the top cap lock nut
The lock nut on the top of the damper rod sets the height of the cap as it screws down. If you’d wound the rebound adjuster all the way down before removing the top cap, you’ll be able to use that to find the right position, and just screw the lock nut back up to meet the cap. However, if you didn’t, don’t screw it all the way in now, instead, set the position of the locknut before putting the spring back on – on this model, there should be 11mm of thread above the nut.

Step 20: Fit the spring
Pull the damper rod up then drop the spring down over the rod with the tighter-wound coils to the bottom (this is on my 1999 bike, on the previous model of ZX-6R, they go to the top, so check in your Haynes manual). Next drop the washer, then the spacer, then the other washer on. Finally, drop the damping adjuster rod back into the damper rod.

Step 21: Screw on the top cap
If you had wound the rebound adjuster all the way in before removing the cap, now just wind the cap back onto the top of the damper rod until the adjuster screw just touches the adjuster rod. DO NOT tighten it any further; all you need to do now is wind the lock nut back up to meet and secure against the bottom of the preload adjuster in the top cap. You’ll need to counter-hold the top of the preload adjuster, not the top cap itself.
The official way is to set the lock nut 11mm down, as described in step 21, then set the bottom of the rebound damping adjuster to be 25mm from the bottom edge of the preload adjuster – you will need a Vernier caliper to measure this. Using this method, screw the top cap down until it meets the locknut at 11mm, then tighten the lock nut against the bottom of the preload adjuster, holding the top of the adjuster with a spanner.
Step 22: Screw the stanchion to the fork cap
Pull the stanchion up and screw it onto the fork cap, making sure it’s not cross-threaded. Tighten it as best you can by hand.
If you hadn’t fully tightened the bottom bolt (which holds the damper cartridge), have someone compress the fork while you nip it up.
Step 23: Finish tightening the fork caps in the bike
Pass the fork back through the top and bottom yoke, carefully setting the height of it relative to the top edge of the top yoke. Of course, make sure both fork legs sit at exactly the same height on either side.
Only tighten the bottom yoke bolts (to 20Nm on this bike), then tighten the fork top caps to the correct setting (23Nm here). Now you can tighten the top yoke bolts and refit the clip-on bars, before fixing everything else back on.
If you can’t do this job yourself, your dealer will be happy to take the work on. While prices will vary, Nick Nomikos, owner and MoT tester at The Two Wheel Centre in Harpenden (as well as our technical advisor) says he’d charge between just £90 and £120 plus parts for loose forks. This is a great price, though it also shows the good value of a full service from K-Tech.