How to fix suspension linkage and swingarm bearings


By John Milbank
Consumer Editor of Bennetts BikeSocial
30.03.2020


Ignore your motorcycle’s swingarm and linkage bearings at your peril. While they’re easy to forget about, water and road dirt will damage the relatively fine bearings over time, leading to a progressive degradation of your bike’s handling. There’s no point spending a fortune on a new shock, or constantly tweaking the settings if the suspension isn’t moving freely.
Most motorcycles have a suspension linkage between the swingarm and the shock absorber, though on twin-shock bikes you’ll likely see the shocks connected direct to the swingarm. The chances are that you’ll find three or four needle roller bearings in a linkage, plus needle and ball races in the swingarm. None of these bearings are as easy to get at, but keep on top of them and you’ll save yourself hassle and expense later…


An older bike can feel like a new machine when its suspension is working properly
How do I look after my bike’s swingarm and linkage bearings?
Water ingress is the main cause of damage to your motorcycle suspension bearings – either through using a pressure washer or hose very close to the bearings or, especially in the case of off-road bikes, water naturally finding its way in.
I’m not saying don’t use a pressure washer – it’s simply a tool that should be used the correct way – so don’t put it close to any bearings as pressurised water will soon get past the seals, especially if they’re old and tired.
The bearings should be re-greased regularly – on this 1999 Kawasaki ZX-6R the recommendation is every 8,000 miles / 12 months.

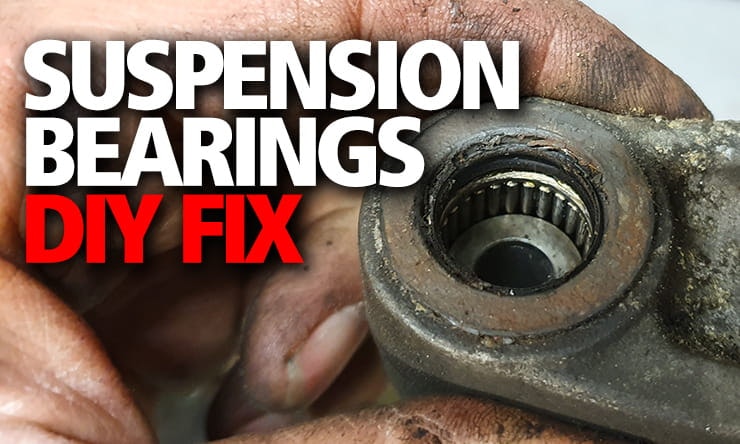
Getting the linkage off and finding bearings in this condition means you’ve only got to apply some grease
How long should the bearings in my bike’s suspension last?
How long your bike’s suspension linkage and swingarm bearings last will depend on how you use the bike and how well you look after it. An off-road machine could see the bearings failing in a year if you ride through deep mud and water a lot, while a road bike that’s only used in dry weather might not need replacement for many tens of thousands of miles.
Keeping the bearings greased and checking the condition of the seals will make all the difference; the problem is that you of course have to remove the swingarm and linkage to get to the bearings. Still, that’s an easier and far cheaper job than removing the swingarm and linkage, then having to drive out the old bearings and press in new ones…

The linkage bearings in my WR250 were rusted solid
How do I know when my swingarm and linkage bearings need replacing?
For many, it will be an MoT that alerts them to the fact that the swingarm and linkage bearings on their bike need replacing.
With the back wheel off the ground, supported by a centre stand or other stand (like an Abba Sky Lift) that doesn’t hold the swingarm, grip the ends of the swingarm and try rocking it from side to side and up and down – expect a little up and down movement in the shock, but try to feel for worn bearings. Also try bouncing the back of the bike up and down to see if the swingarm can move freely – this is a bit of a bodge test really; the best way to check it is to remove the rear wheel and the shock absorber, then feel how the swingarm moves.

A set of bearings from Wemoto will save you a lot over the OE parts prices
What parts do I need?
Maintaining the bearings just requires a quality grease. I use Corrosion Block from the makers of ACF-50, but there are lots of other suitable products available that meet or exceed the requirements of the NLGI (National Lubricating Grease Institute) for GC-LB. GC denotes use in wheel bearings on vehicles under mild to severe duty with the highest temperature ranges, while LB relates to a vehicle chassis and its components under mild to severe duty, which can be exposed to water and other contaminants (there are also GA and GB, as well as LA classifications for less severe environments).
If you’re replacing the bearings, you’ll need those and new seals. There are three needle roller bearings and one ball race in the swingarm of this bike, along with two seals. Direct from Kawasaki, these would cost a total of £67.70, though a full set of Slinky Glide bearings and seals from Wemoto would be just £48.52.
In this ZX-6R there are a total of six needle roller bearings and eight seals in the linkage, with some of the OE bearings no longer available direct from Kawasaki. Your dealer will of course be able to source suitable parts, but again, check the prices at Wemoto for pattern bearings, especially as for most bikes you can get them with the seals as a kit.


What tools do I need?
This article isn’t intended to be all you need to maintain or replace the swingarm and linkage bearings on any motorcycle. I’m basing it on my 1999 Kawasaki ZX-6R, but your bike will have its own unique needs, so I thoroughly recommend buying a Haynes workshop manual first. My hope is that this will give you the confidence to take on the job for yourself, but only with a workshop guide specific to your machine will you have the correct procedure. Remember that Bennetts customers can save a massive 40% on Haynes manuals at Bennetts Rewards.
If you’re just greasing the bearings, you’ll need the tools to remove the rear wheel, shock, linkage and swingarm. That means a socket set, spanners and ideally a torque wrench.
Unfortunately on this bike at least, removing the linkage also requires removing the exhaust header pipes, so you’ll need a set of exhaust gaskets.
If you’re replacing the bearings, you’ll need a screwdriver or pick to remove the seals, a hammer and drift to get the old bearings out and a means of pressing the new bearings in. I have a length of threaded rod with some large, thick washers that I use with appropriately-sized sockets to press the bearings home.
Finally, of course, you’re going to need a way to support your bike. If it has a centre stand you’re laughing, but otherwise a paddock stand is no use as it carries the bike on the swingarm that you need to remove. You can try lashing something up with a scaffold pole and some workbenches, but you MUST take care that the bike is well supported. I use an Abba Sky Lift with the swingarm removal adaptor, which replaces the footrest hanger bolts. However you support your bike, the rear suspension must be completely free to move.

A length of threaded rod can be used to make a bearing press
How do I maintain and replace the swingarm and linkage bearings on my motorcycle?
Looking after – or replacing – the bearings in your swingarm and suspension linkage isn’t a particularly difficult job, but it can be time consuming.

Step 1: Soak bolts with penetrating fluid
Ideally at least the night before, soak all the bolts you’ll be removing with penetrating fluid. I was fortunate in that all except the hugger set-screws came out easily; if you have issues getting any bolts out, you might need to use some heat, but take extreme care – start with a hair dryer or hot air gun and warm the area around the bolt, not the bolt itself.
Step 2: Remove the rear wheel
Also take off anything else that’s attached to the swingarm, like hugger, chain guard and rear brake hose clips.

Step 3: Remove the exhaust system if you have to
Unfortunately on this bike, the exhaust downpipes have to be removed to get the linkage off. In this case, it means removing the radiator bolts and getting it out of the way, then taking out all eight manifold stud nuts. Take extra care here as they can be seized; break a stud in the head and you could face all kinds of problems.

Read our article on rebuilding a shock absorber here
Step 4: Remove the shock absorber
Keeping in mind that the swingarm will drop down, remove the bottom bolt that joins the shock to the linkage. Then remove the top bolt and take the shock out. The shock has rubber-damped bushes inside – check these for any wear or damage and replace them if necessary.
You’ll now really be able to feel the condition of the bearings in the linkage and the swingarm – if it doesn’t all move smoothly, you’ll need to replace them.

Step 5: Remove the linkage
Remove the bolts that hold the linkage and the connecting arms to the swingarm, and the one that joins the linkage to the frame, then take it out. The bolts might be different lengths, so keep them organised.

Step 6: Grease the linkage bearings
Slide out the spacers inside the linkage, then check the condition of the seals and the bearings inside. If they’re complete and show no signs of corrosion, pack them with a suitable grease as explained above. Make sure you check the condition of the spacers too – replace them if necessary – but make sure they’re clean and greased.

Step 7: Remove the swingarm
First, remove the nut on the left-hand side (or the right, if someone’s put it back together incorrectly in the past), then support the swingarm while you withdraw the pivot bolt. You might need to tap this through with a large drift until you can get hold of it. Moving the swingarm up and down can make the bolt easier to remove.
Once the swingarm is out, check the condition of the chain guide and thoroughly clean it – if it’s damaged or very thin, you should replace it.

The bearings here look in good condition
Step 8: Grease the swingarm bearings
As with the linkage, carefully check the condition of the seals and the bearings. If all’s okay, pack them with suitable grease, then put everything back together. Ideally use a torque wrench – on this ZX-6R G2, the swingarm pivot nut should be tightened to 110Nm, the linkage arm to frame bolt to 34Nm, the other linkage bolts to 59Nm and the shock bolts to 34Nm. The rear wheel axle nut needs tightening to 110Nm, and don’t forget the split pin. You must check the torque settings for your own bike in the Haynes manual.
When you replace the exhaust, you must use new gaskets – they’re £1.81 each from Wemoto – and make sure you clean the studs and coat them with copper grease.
Step 9: Remove the old bearings
After picking the seals out, check the depth and position of all the bearings, then you can use a hammer and drift to carefully drive the old bearings out of the swingarm and the linkage, but make sure you check for any circlips first, as well as lips that could dictate the direction the bearings have to be removed.
Driving the bearings out this way will destroy them, but you shouldn’t be removing them unless necessary anyway.

Step 10: Fit the new bearings
You’ll need to check your Haynes manual for the process that works for your bike, but it’s important that you don’t try to hammer needle roller bearings home. This is where you can use a long threaded rod, combined with a pair of nuts locked together on the bottom, then thick washers and a socket to brace against the outside of the swingarm or linkage. At the other end, use washers and a socket that’s big enough to press on the edges of the bearing shell, but that just fits into the linkage or the swingarm. By holding the locked nuts with a spanner or vice and tightening the nut at the other end, you can push the socket down behind each bearing to seat it.
Make sure you hold the greased bearings and guide them in straight as they can easily twist.

Another way to fit the bearings, at least to the linkage, is using a vice and suitable socket if your vice is large enough.
Don’t be tempted to use old bearings to press new ones in – they’ll get stuck in behind the new ones!
Once the bearings are all in place grease them thoroughly then fit the new seals, remembering to clean, grease and reinsert the spacers.

A new hugger from Pyramid Plastics finished the bike off
Step 11: Put it all back together
Now you can put everything back together with the knowledge that next time, you’ll just need to grease them. The old (and overly colourful to my eyes) hugger was damaged while taking it off as the set-screws were seized, so I took the opportunity to replace it with a plain black one from Pyramid Plastics. Perfectly formed from fibreglass with a deep gloss finish and a protective film to minimise stone chips, the hugger has a chainguard built in that properly protects the wheel from stray lube.
It fitted perfectly, dropping exactly over all the holes in the swingarm, really finishing my bike off a treat. You can find a huge range of products, from Extenda Fendas to bodywork and screens for most new and old bikes on the market at the Pyramid Plastics website.

If you can’t do this job yourself, your dealer will be happy to take the work on. While prices will vary, Nick Nomikos, owner and MoT tester at The Two Wheel Centre in Harpenden (as well as our technical advisor) says he’d charge £75 inc VAT to grease swingarm and linkage bearings, or £135 plus parts to replace them (assuming they come out okay).