How to adjust the valve clearances on your motorcycle


By John Milbank
Consumer Editor of Bennetts BikeSocial
27.02.2020


Valve clearances are important, but having them done by your dealer can be very expensive; it’s one of the main reasons a lot of bikes are traded in. But ignore them at your peril as over time your engine can be seriously damaged.
Before I bought my 1999 Kawasaki ZX-6R I’d never checked clearances on anything that didn’t have a screw and locknut, but now I’ve realised just how simple it can be…
That little metal disc looks so insignificant, but it’s vital to maintaining a healthy engine
What are valve clearances?
Valve clearances on motorcycle and car engines effectively relate to the gap between the top of the valve stem and the cam that operates it.
The inlet valves in the engine open to allow air and fuel into the cylinder, while the exhaust valves let the burnt gases out. Needless to say, it gets hot inside the engine, so when the valves close, they shut onto a hardened ‘seat’, which acts as a heat-sink. If the valves aren’t completely closed at the point of ignition and the expansion of the burning gases that push the piston down, the valves will be harmed and the high-pressure gases can cause serious and irreparable damage to the valves, the seats and other parts inside the motor.
Why is it important to have a gap in valve clearances?
If the valve clearance was set to zero, the valve could theoretically still be set to close fully, but as the engine gets warm, the parts expand; with no gap, the valve wouldn’t close completely. That’s why valve clearances MUST be checked with the engine stone cold.
How do I know when my valve clearances need adjusting?
Incorrect valve clearances will lead to poor running and, eventually, serious damage to your bike. You’ll find plenty of forum and Facebook posts from people claiming that they didn’t bother and their bikes are fine, but the damage will be progressive.
My ZX-6R hadn’t suffered a hard life, but at just over 18,000 miles, the exhaust valves were very tight. Personally, I’d always look for proof the clearances had been correctly dealt with on schedule when buying any used motorcycle; it’s a sign of a caring owner and will give added confidence that the engine will last.


Shims don’t need to be expensive, but getting to them is time consuming
What parts do I need?
If you’re lucky, when you’ve checked the valve clearances, you’ll find they don’t need adjusting. The exhaust valves are the most likely to be out, but there is some tolerance; on my ZX-6R G2 for instance, the inlet valves should have a gap of between 0.11 and 0.19mm, while the exhaust valves should have between 0.22 and 0.31mm.
Chances are though, at least one of the gaps will need adjusting. We’re focussing on bucket and shim clearances here as it’s the most common on modern motorcycles, so you’ll need to buy some shims. The problem is, you’ll not know which ones until you’ve measured them, so expect to have your bike off the road for a few days, unless your local dealer has them in stock.
I got mine from Wemoto, where for this bike they cost between £2.20 and £4.85 each – if you bought them from Kawasaki they’d be £9.50 each.
You’ll also likely need some gaskets – the pick-up coil cover needs removing on my ZX-6R to set the position of the crank; a replacement gasket from Wemoto costs £3.42 and is the genuine Kawasaki part.
The Haynes manual says that the four O-rings that seal the camshaft holder against the cylinder head should be replaced; as oil was leaking into the plug wells, I changed these at a cost of £1.75 each, along with the four gasket bearing caps that sit on top of the camshaft holder at £5.17 each. The cam-chain tensioner O-ring should also be replaced at £1.86. This bike had been stood for almost ten years, so it’s no surprise that some of the seals were failing.
If any shims do need replacing, you’ll need some fresh engine oil to lubricate them, but the chances are you’ll be doing a full service anyway, so you should have it to hand.


What tools do I need?
This article is not intended to be all you need to adjust the valve clearances on any motorcycle. I’m basing it on my 1999 Kawasaki ZX-6R, but your bike will have its own unique needs, so I thoroughly recommend buying a Haynes workshop manual first. My hope is that this will give you the confidence to take on the job for yourself, but only with a workshop guide specific to your machine will you have the correct procedure. Remember that Bennetts Rewards members can save a massive 40% on Haynes manuals at Bennetts Rewards. You’ll also need the following…
General tools to disassemble your bike
Feeler gauge
Micrometer
Torque wrench
Protective gloves
Make sure your feeler gauge covers the sizes you need to measure in increments of 0.01mm – I had to buy myself a new one, but it’s was only £3.99 (and being a Bennetts Rewards member, I save 10% on every purchase at Halfords).
You really do need a torque wrench if the shims need replacing as the camshaft holder is very delicate, and you’ll also need a micrometer to measure the thickness of the shims that you remove. There’s a chance they’ll have their thickness engraved into them, but none were legible on my bike and you should check them anyway. I got a high-quality Mitutoyo 103-137 for Christmas, which cost £46.99. You can pick up cheaper versions, but I figured it was a lifetime investment. I’m sure my daughter will thank me when I’m gone…
How do I check the valve clearances on my motorcycle?
If you’re lucky, your bike has hydraulic tappets, which automatically set the gap between the cam and the valve (usually via a rocker arm), but these are usually only found in low-revving engines like some Harley-Davidsons.
Screw and lock-nut adjusters tend to feature in smaller capacity bikes (like my Honda Grom MSX-125) and just require a spanner and pliers to adjust, or you can get a tool that holds the locknut while you turn the adjuster.

This is the tool I use to adjust screw and lock-nut valve clearances on my Grom and the pit-bike I used to own, though there’s no space for it on the inlet of the Honda unless you remove the airbox
Most bikes use a bucket and shim – the cam presses on assembly, with the shim dictating the thickness of the pair – this is what we’re looking at in this article. This bucket and shim then press down onto the valve to open it.
Sometimes you’ll find the shim on top of the bucket, but typically it’s underneath it, which tends to be more reliable, especially in high-performance motors.
A spring returns the valve to a closed position, unless you have a Ducati, which is likely to have ‘Desmodromic’ valves. These use an arm to both open and close the valves, which is potentially more accurate, but it also means there are two shims for each valve.
Step 1: Ensure the engine is stone cold
This really is important, so leave your bike to cool overnight before starting work on it

Step 2: Strip the bike down
To get to the valve cover on this bike, the fairing panels and tank need to come off, as well as the carbs. There are also panels on the side of the engine that need to be removed.
To remove the carbs, the coolant needs draining as they’re heated on this model – that might seem a pain, but you’re likely to be carrying out a major service if you’re doing the clearances.
I’d also removed the radiator as I was doing everything on the bike at the same time, but you can just remove the top bolts and lower it if you want.

Step 3: Remove the cylinder head cover
There are six bolts holding the cylinder head cover to the top of the engine – don’t just spin them out. Instead, turn each a small distance at a time in a cross pattern so that the cover is slowly and evenly released. It’s bolted to the camshaft holder, which is fairly fragile.
Quick tip: Take care of the camshaft holder
The cast aluminium camshaft holder carries the top bearing surfaces for the camshaft, but it’s also what the camshaft cover bolts onto. It’s vitally important that you take care when working with it, as it’s very easy to damage. Don’t ask me how I know.
The problem is that this holder is machined to accept the camshafts while it’s mounted to the cylinder head during manufacture; if it gets damaged, you need to buy a complete cylinder head, unless you can machine a new bracket that will fix the issue – again, don’t ask.

Step 4: Make a chart
You need to record all the measurements you make, so draw the layout on a piece of paper, making sure there’s no way you’ll muddle it up.

Step 5: Position the crank
On this bike, the pick-up coil cover on the right of the engine needs to be removed, then a 17mm socket used to rotate the engine clockwise until the ‘T 1.4’ mark aligns with the two mating surfaces of the engine.
At this point, either cylinder number one (from left to right as you sit on the bike) or number for will be at top dead centre (TDC) – that means the piston is at the very top of its compression stroke and the valves will be fully closed; this is the position at which the clearances need to be measured. If the cam lobes of cylinder one are facing away from each other and clear of the valves, then cylinder one is at TDC; if they’re facing each other and pressing on the valve buckets, cylinder four is at TDC. Your Haynes manual will tell you which valves to measure in this position.

Step 6: Measure the first set of clearances
Once you know which valves to measure first, use your feeler gauge to check the gaps. Set your feeler gauge to the size it should be (you might need to combine two or more blades), then poke it in between the cam and the bucket; you’re feeling for a slight drag as you push it in and pull it out.
You’ll find it tricky at first, but keep trying thinner and thicker blades until you get a feel for it. Once you have it sussed, write the measurement on your piece of paper, making sure it corresponds to the correct valve
Quick tip: Practice and oil
Try a few combinations of blades when checking the valves; for instance – if you think you need 0.05mm and 0.06mm for a measurement of 0.11m, check the gap with the 0.10mm single blade too; some of the thinner ones can fold up, making it hard to measure. It’s also worth putting a wipe of clean engine oil on the blades so that they’ll slide in.
Remember that there is a certain tolerance in the clearances, so don’t get too hung up on an uncertainty of 0.01mm.

Step 7: Measure the second set of clearances
Once you’ve taken the measurements of a total of eight valve on this 16-valve machine, rotate the engine through 360° so that the ‘T 1.4’ mark aligns again. The other cylinder should be at TDC and you can now measure the remaining valve clearances.
If you’re lucky, all of the clearances will be within the specified tolerances so you can put the bike back together and go for a ride. Chances are though, at least one gap will be tight – probably on the exhaust – so mark any that are out clearly on your piece of paper…

Holes in the camshafts can be used to tie the chain in place but you have to be VERY careful not to damage it
How do I adjust the bucket and shim valve clearances?
The camshafts on this bike should be removed with the T 1.4 mark still aligned with the engine mating surfaces, but if you want to tie the chain to the camshafts, rotate it 360° until the holes in the gears are exposed at the top. Make sure you rotate the camshafts before removing the holder, and ensure you align the T 1.4 mark.

Step 8: Remove the cam-chain tensioner
The cam-chain tensioner has a spring in it that pushes a plunger against the chain, but it’s on a ratchet that can’t return so NEVER partially unscrew the adjuster then tighten it back up.
First unscrew the central bolt in the tensioner almost all the way out to relieve the pressure, then you can remove the tensioner body itself.

Step 9: Remove the camshaft holder
There are 10 bolts holding this camshaft holder down and it’s surprisingly fragile – it’s very important that you undo each bolt a little at a time in a criss-cross pattern; the valve springs are pushing some of the cams up, so the camshaft holder can be easily distorted or even cracked. Bad times.
Once it’s off, check the bearings surfaces for wear or damage.

Step 10: Remove the cams
The cams are labelled ‘IN’ and ‘EX’ on the centre of the shaft (they have both ‘IN’ and ‘EX’ on the gear at the end, which can be confusing) – don’t muddle them up. You can lift the cam chain off the cams then remove them, but you must use something to avoid dropping the chain down into the engine; I used a piece of pipe.
Another option is to zip-tie the chain to the cams; this can be particularly handy if you only need to remove a couple of shims, but you must be very careful not to twist and damage the chain; this is something of a bodge, but it helped me out on the fifth time I had to remove a cam (please, don’t ask).
You should check the bearing surfaces and lobes for any signs of wear or damage.

Step 11: Remove the shims
You only need to remove the shims from the valves that have incorrect clearances. I found it easiest to get them out using a magnet, which lifted the bucket and the shim with it.
Place the bucket in the corresponding spot on your piece of paper or in a tray so you can keep track of what you’re doing. It’s really important that you DO NOT muddle these buckets or shims up, so have a clear working space and make sure nothing can get knocked, especially if it’s going to be a few days before they go back in.

Step 12: Measure the shims
Shims come with a size mark on them, but there’s a good chance it will have worn away and you should check them anyway using a micrometer. Measure each shim one by one and write the size next to the gap you measured.

Using the chart in the Haynes manual, you can then use the gap measurement and the present shim to find the size of shim you need. It sounds complicated, but once you have the numbers it makes sense – For instance, a gap of 0.10mm falls into the 0.07-0.11mm range on the chart. Given that the present shim is 2.95mm thick, we can see on the chart that a 2.80mm shim is required; that’s what you need to buy.

I was able to swap some shims around from incorrect clearances to reduce the number required. Yes, this looks complicated, but all that matters is that when you do the work, you know which numbers are which. I found that some of the existing shims that were in incorrect gaps were the sizes I needed for other valves, which saved some money – I only needed four new shims instead of 11.
If you place your order in time with Wemoto, you could get them the next day, but give yourself time to get the parts in and reassemble the bike, and keep the open engine covered up.

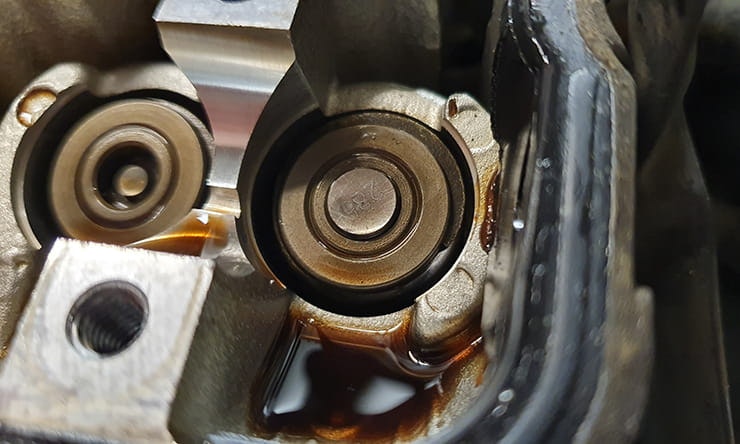
A shim in place on the left, with the bucket replaced on the right
Step 12: Refit the buckets and shims
Once you have the new shims, lubricate them with fresh engine oil and pop them into the tops of the valves, then slide the oiled buckets back over. Make sure you do one at a time, so you can’t muddle them up.

Step 12: Fit the cams
Oil the cylinder head’s bearing surfaces then, making sure they’re on the correct sides, refit the cams. You need to fit the chain to the exhaust cam first, pulling it taught at the front of the engine with the T 1.4 marker lined up with the engine casing joints and the ‘EX’ line on the exhaust camshaft’s gear lined up with the top of the engine casing. Then fit the intake cam with the chain tight between the two gears and the ‘IN’ line matching the top of the engine casing. On this bike, there needs to be 30 chain links between those two lines on the gears, to ensure the chain is correctly fitted.
Step 13: Bolt the camshaft holder back on
Wipe some fresh engine oil on the bearing surfaces, check the O-rings are in good condition and correctly aligned, then locate the camshaft. It’s vital that you tighten down all ten bolts very gradually and in a criss-cross pattern. Take your time and use a torque-wrench for the final tightening – on this bike it’s just 12Nm.

Step 14: Refit the cam-chain tensioner
Without refitting the spring and bolt, reset the tensioner by holding down the ratchet and pushing the plunger all the way back into the body (the O-ring should be replaced). Bolt the tensioner body back into the engine, then, after checking the condition of the sealing washer, insert the spring, bolt and washer – as it’s tightened, you’ll hear the plunger push out. Check the cam-chain is tight and rotate the crankshaft through two full turns, then check again.
Step 15: Measure the valve clearances again
The moment of truth – following the same process as you did before, check all the valve clearances. Fingers crossed you didn’t miss-measure in the first place as it’s really frustrating to have to take it all apart again then order more shims (again, don’t ask).
Step 16: Refit the cylinder head cover
Check the gaskets and replace if necessary. Still using a gradual cross-cross pattern, refit the cylinder head cover. Then put everything else back together and be proud of the fact that you’ve completed one of the most challenging maintenance jobs on a bike. Great work!
If you can’t do this job yourself, your dealer will be happy to take the work on. While prices will vary, Nick Nomikos, owner and MoT tester at The Two Wheel Centre in Harpenden (as well as our technical advisor) says he’d charge £198 to check the valve clearances, plus around £66-£100 if they need adjusting. Prices include VAT, but not parts.