Workshop advice: How to fit a shock, change bearings and start a custom motorcycle build


By John Milbank
Consumer Editor of Bennetts BikeSocial
22.03.2019


Maintaining your own motorcycle is one of the most rewarding things you can do; you’ll save money, you’ll learn more about your bike, and you’ll know what’s been done (and how well).
BikeSocial’s new regular Garage Chat videos and articles will share the tips and advice we pick up while working on our motorcycles – this episode sees us working out how to fit a shock absorber to an old Kawasaki ZZR1100, how to easily replace the linkage bearings (with some home-made tools), and how to tackle your first custom bike build…
What are the signs of a bad shock absorber?
Jonathan Mansfield is a motorcycle instructor from Bedfordshire; he rides his 1990 Kawasaki ZZR1100 at least 10,000 miles a year, and over the last few months has been finding his bike had vague handling, and was bouncing alarmingly at the rear.
By pressing down on the back of the Kawasaki, then letting the bike come back up by itself, it was clear that there was no damping in the shock, which just let the spring pogo up and down; with no control to the movement of the rear, any bumps in the road set the bike off in an uncontrolled bounce, resulting in very poor handling as the rear squats and the front-end geometry constantly changes.
If feeling for a damaged shock, it’s also important to check for any free play – worn or seized bearings in the linkage that joins the shock to the swing-arm and frame/rear of engine can result in excessive vertical movement in the swing-arm, or severely restricted movement. If there’s side-to-side play in the wheel, it’s likely your wheel bearings or swing-arm bearings are shot; either way, it needs sorting.
What’s the best shock absorber for my motorcycle?
Assuming your shock can’t be rebuilt (try companies like K-Tech and Maxton), you’ll most likely be looking at an aftermarket item, from the most basic budget units to big-brand race-spec models.
OE shocks can be eye-wateringly expensive – the original Kawasaki part for Jon’s ZZR costs £1053.42 – while a second-hand unit will most likely be in a similarly worn state to the one you’re replacing, especially on an old bike like this.
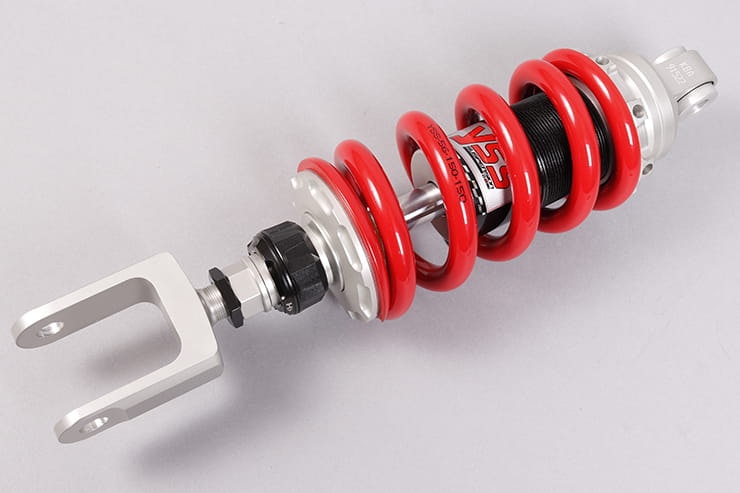
Jon wanted something well-built and reliable, but that wasn’t going to break his limited budget. The YSS series of shock absorber from Wemoto.com – the UK’s biggest source of motorcycle parts – are ideal, as they’re extremely well-priced, but also tend to offer good levels of adjustability; the one for the Kawasaki includes preload, rebound damping and ride height adjusters. It’s also got Teflon-coated bushes and a hard-chromed shaft for a fraction of the cost of the original.
This YSS shock from Wemoto.com costs a fraction of the price of the original, but has transformed the handling of the bike.
How do I replace the shock on my motorcycle?
Swapping a bike’s shock absorber isn’t a tricky job, but you do need to support the rear of the motorcycle without using the swing-arm, which needs to be free to drop all the way to the end of its travel.
If your bike has a centre-stand, you’re sorted, but otherwise you’ll need a winch to hang the back of the bike from, or a strong pole / length of wood that the tail of the bike can sit on. Be extremely careful to ensure that the bike is safely supported before going anywhere near it, and be certain that when you start loosening or tightening bolts, you won’t twist the bike off its mounting.


Using an Abba Sky Lift makes working on any bike a lot easier.
Without a centre-stand, by far the easiest – and safest – way to remove a shock (or do many other jobs) is to use an Abba Sky Lift. I’ve had one for several months now and can honestly say it’s one of the most useful tools in my garage.
The shock will be held with just a top and bottom bolt, but you’ll most likely need to get the wheel out to reach it; on the ZZR1100, it’s well buried.
If you find access is limited – particularly on mono-shock bikes like the ZZR, you could have more chance of getting the socket on if you use star, rather than hex tools – these give you more angles of attack.

If space is tight, a star socket offers more angles to use your breaker bar or ratchet at. Chances are, you won’t get the leverage with a spanner.
If the bolts are very hard to free off, try soaking them for a few days beforehand with a penetrating fluid. If they still won’t come off with a decent sized spanner, try to get hold of a breaker-bar. But do double-check you’re turning the nut or bolt the correct way – ‘righty tighty, lefty loosey.’
We ended up using an old ratchet with a length of pipe on the end, but this is a very good way to break a ratchet as they’re not designed for this amount of force.
How do I replace the bearings in my swing-arm linkage?
Worn, damaged or seized suspension linkage bearings are an extremely common cause of handling problems – on dirt bikes in particular, they can rust and become stuck solid – but road bikes can also suffer, especially on the lower linkage bearing, which often catches all the road filth as you ride. Getting too close with a jet wash can also drive out the grease.
Replacing the bearings isn’t expensive, and Wemoto.com offers kits for the vast majority of bikes, in the case of the ZZR1100, complete with new seals. Check which bearings you need, and – importantly – how many, to be sure that you pick up the correct kit.

This bearing set from Wemoto.com helped bring the suspension back to as-new condition.
Removing the bearings from a suspension linkage is slightly easier than from a wheel or swingarm as you have full access to both sides of the bearing. You could carefully hammer them out, but a far better method is to use is with a press.
While you can buy a press, I use a length of threaded rods, a variety of sockets, and some large, thick washers. Pop a socket behind the bearing that’s just big enough for the bearing to fit into. On the other side, use a bearing that’s just a fraction smaller than the outside diameter of the bearing. Pass the threaded rod through the whole lot, cap it with a couple of thick washers either side, then lock two nuts together beneath the larger socket.
Pop the assembly in a vice, gripping the two locked bottom nuts, then put a nut on the top of the threaded rod, and crank it down to push the bearing out.

Using a couple of sockets on a threaded bar allows you to press the bearings out – and back in – easily.
Fitting a new bearing is just the same, but you need to really take your time and keep tweaking the bearing as it goes in, to make sure it’s completely straight.
You can make the new bearings a little easier to press in by popping them in the freezer the night before you do the work.

This is my other home-made press, which has been used for many years on all kinds of bikes and bearings – there’s a selection of ground-down bearings that I’ve used over the years, including for headstocks.
How do I know what torque to use on my bolts?
The amount of rotational force – or torque – that you use to tighten the nuts and bolts on your bike is important. Some of the bolts (like those of brake parts) can be designed to stretch (these are generally single use), and the amount of force you should use will vary depending on the diameter of the thread, what it’s holding, and what it’s fixing into; the aluminium castings of your engine can be easily destroyed by using too much force. You should also take care if using an anti-seize compound like copper grease… check a workshop manual to be sure of what – if anything – should be used.
Some of the most common torque settings – like those for the wheel axles and fork pinch bolts – will often be given in the bike’s owner’s manual, but if you’re going to do any work on your bike, I’d thoroughly recommend buying a Haynes manual. You can also get them online, but nothing beats having a physical book by your side as you work (and not worrying about spilling oil into your phone/tablet/laptop).
If there’s not a Haynes manual available for your bike, have a trawl of the internet for a copy of the dealer workshop manual. These can be useful, but they’re not written as helpfully as a Haynes manual and you must take care to ensure you have the one for your bike; US and UK machines can have slightly different wiring looms, braking systems and emissions control. I once broke a bolt using the wrong torque on a Honda MSX125 wheel because I hadn’t realised the US and UK machines had different size fasteners on the wheels.
As always, do be wary of malware when downloading any files from t’interwebs.

A quality torque wrench is an investment well worth making. It’ll last many years, and save a lot of potential frustration and expense.
How much does it cost to build a custom motorcycle?
It can cost as much – or as little – as you want it to. The first step is to decide what style of bike you want to build, then you need to choose a donor bike. Watch our video below to see how BikeSocial’s Production Manager Steve Lamb is tackling his first custom build.
Garage chat episode 1

Watch the first instalment of BikeSocial’s new workshop tips (and gaffs)